Version: 4.26, 中文
Created: 2021-02-24, Updated: 2021-03-25
Author: Cyanhall
👉 Star me if it’s helpful.
Created: 2021-02-24, Updated: 2021-03-25
Author: Cyanhall
👉
1.
Preparation
This is the effect we are going to make in this tutorial.
Note: The main content of this tutorial comes from the
Tip: Use ⬆️ ⬇️ to turn the page up and down. We recommend browsing with a large screen for a better reading experience.
Note: The main content of this tutorial comes from the
Content Examples that come with Unreal EngineTip: Use ⬆️ ⬇️ to turn the page up and down. We recommend browsing with a large screen for a better reading experience.
Full Tutorials:
1. UE Niagara: Simple Sprite Emitter
2. UE Niagara: Simple Mesh Emitter
3. UE Niagara: Simple GPU Emitter
4. UE Niagara: Sprite Facing
5. UE Niagara: Blend Attributes By Value
6. UE Niagara: Static Beams
7. UE Niagara: Dynamic Beams
8. UE Niagara: Multiple Renderers
9. UE Niagara: Location Events
10. UE Niagara: Expressions
3.
Introduction
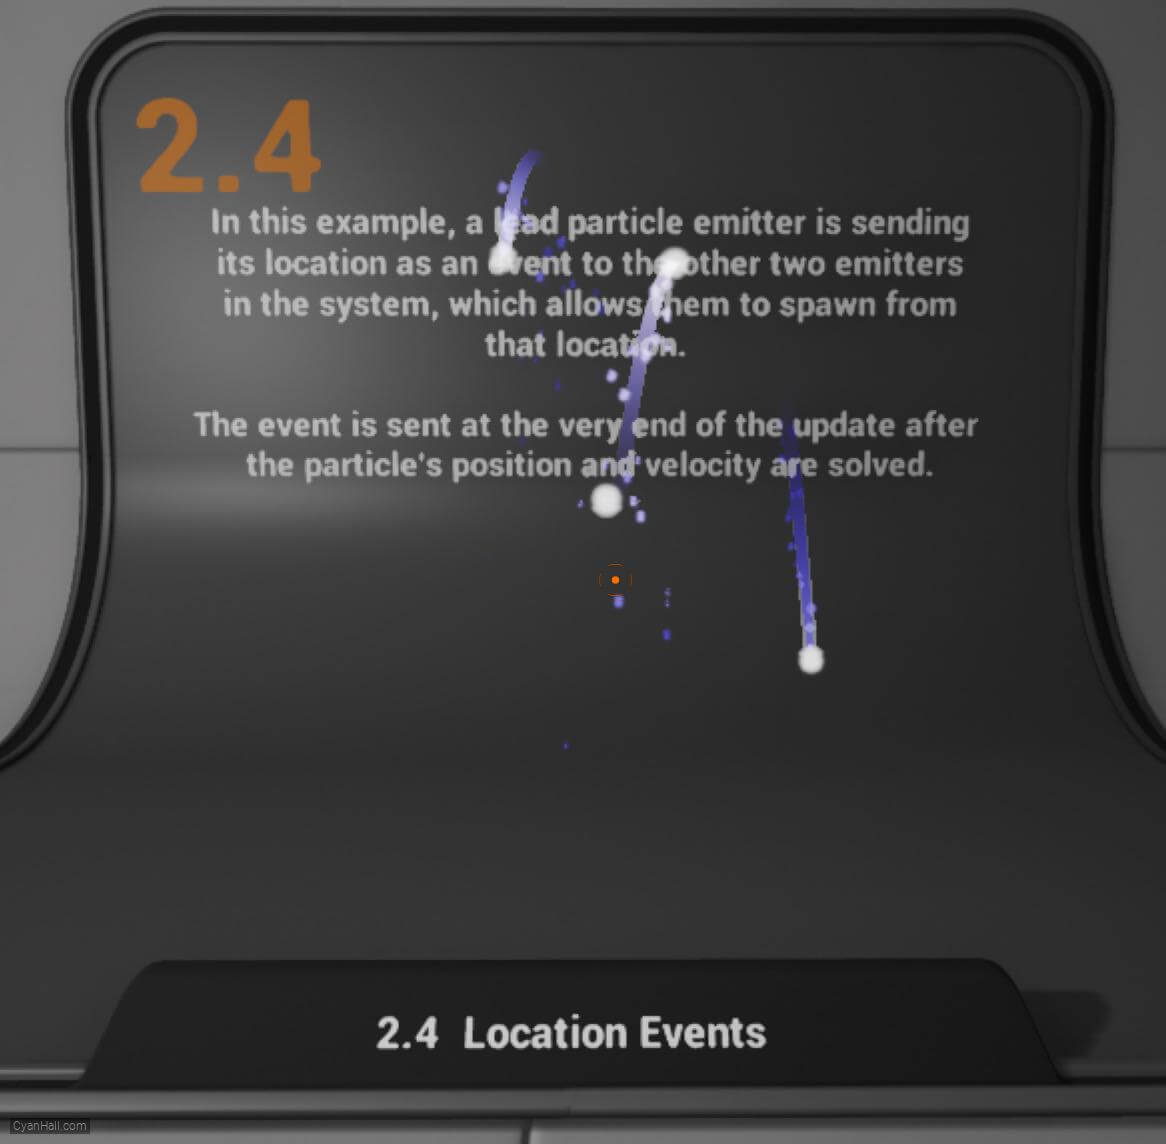
In this example, a lead particle emitter is sending its location as an event to the other two emitters in the system, which allows them to spawn from that location.
This event is sent at the very end of the update after the particle's position and velocity are solved.
This event is sent at the very end of the update after the particle's position and velocity are solved.
4.
Introduction
Currently, Events are CPU Emitter Only!
On GPU Emitters, we do have a Lead/Follower paradigm using the "Spawn Particles From Other Emitter" and "Sample Particles From Other Emitter" modules which utilize the Particle Attribute Reader. There is an example of these behaviors in action in the Niagara_Advanced hallway.
On GPU Emitters, we do have a Lead/Follower paradigm using the "Spawn Particles From Other Emitter" and "Sample Particles From Other Emitter" modules which utilize the Particle Attribute Reader. There is an example of these behaviors in action in the Niagara_Advanced hallway.
5.
Let's start the reconstruction
Right click and select
FX => Niagara System to create. 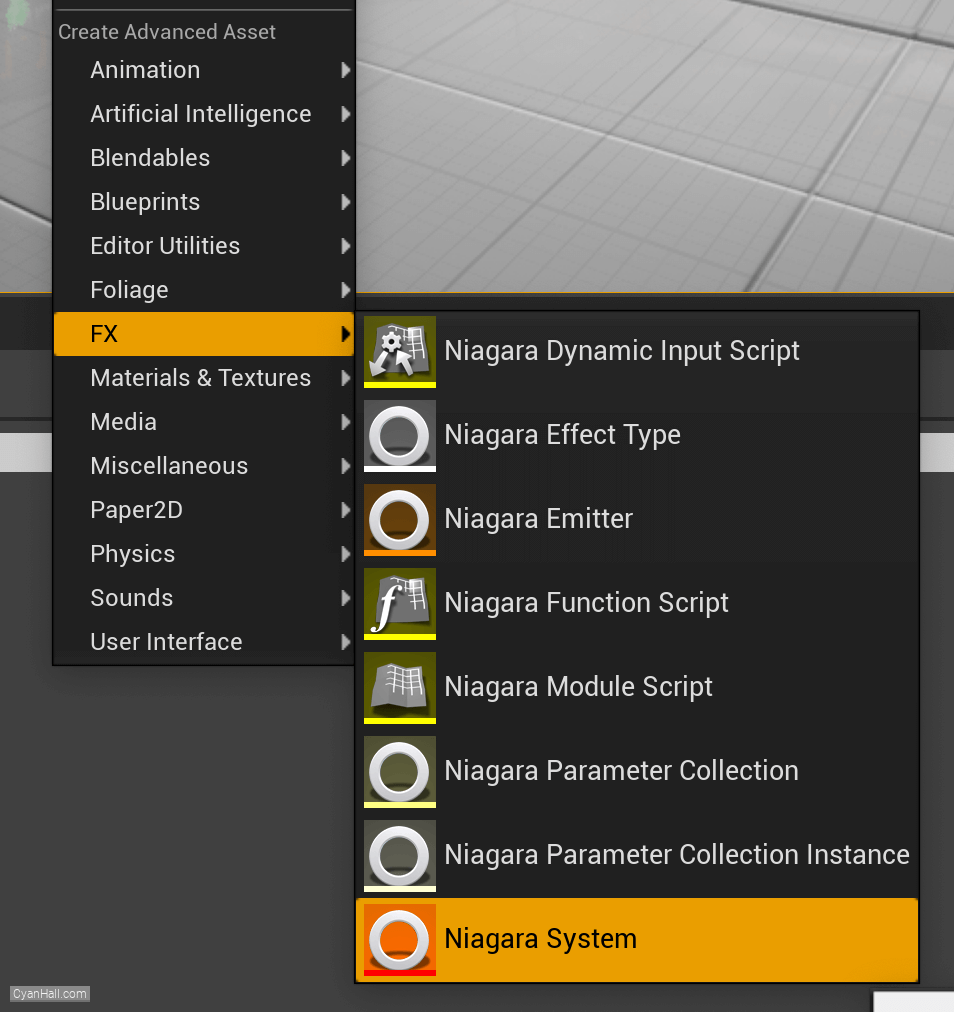
6.
Create Niagara System
Select
Empty template, click + three times and click Finish 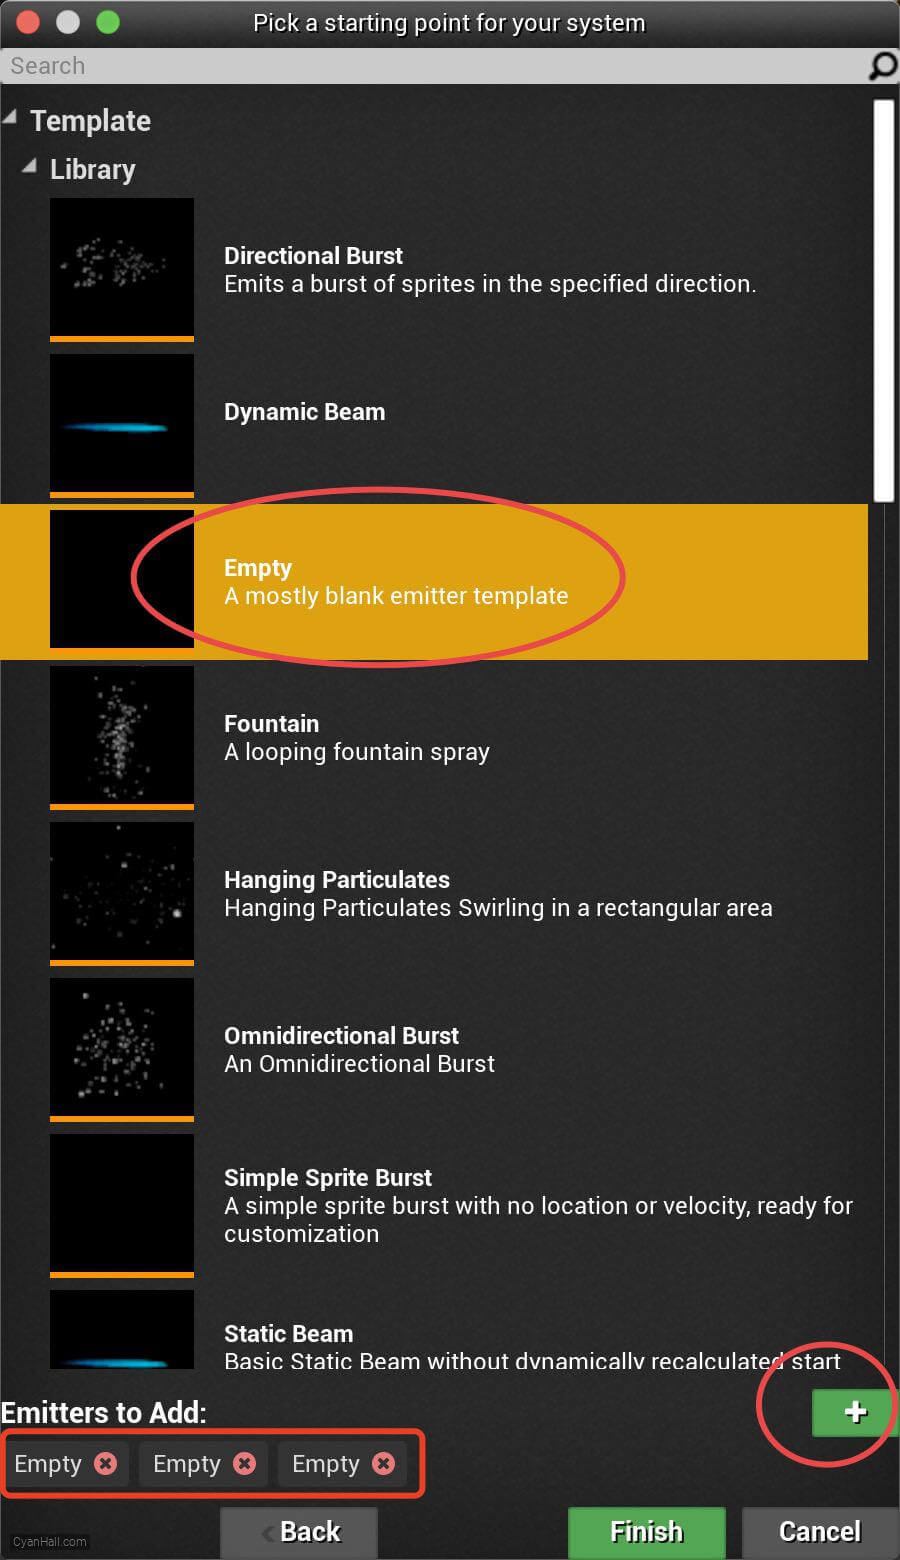
7.
Create Niagara System
As a result, we get a
Niagara System asset, click to open it. 
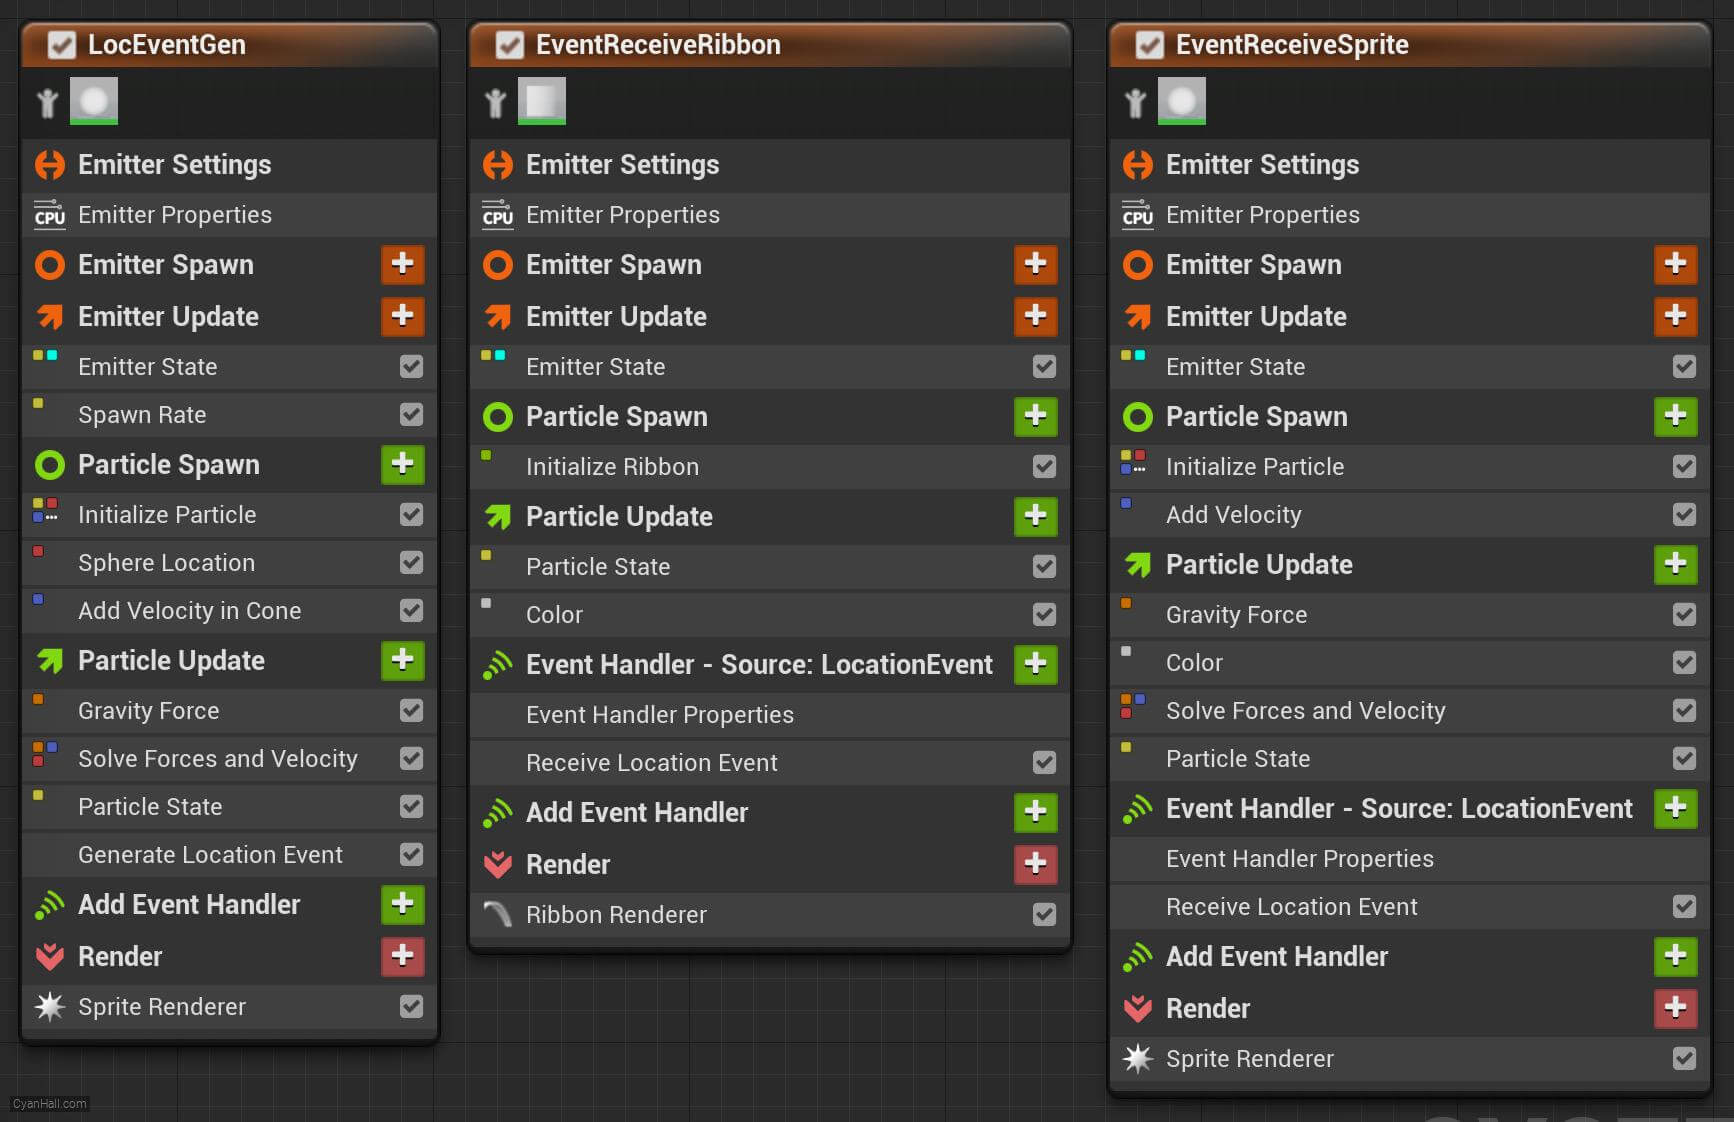
8.
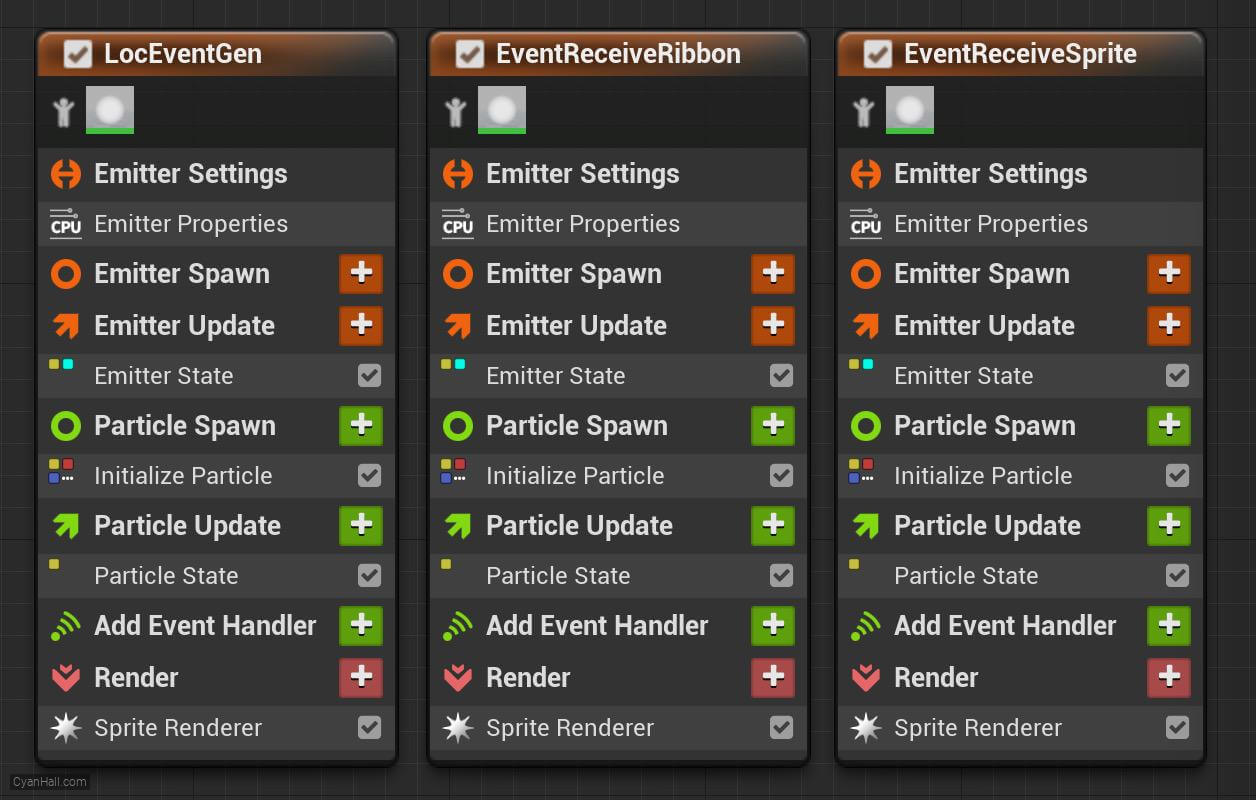
Three Emitters
You can see that we have three emitters, renaming them
LocEventGen generates events, EventReceiveRibbon generates ribbon particles based on events, and EventReceiveSprite generates sprite particles based on events.
LocEventGen, EventReceiveRibbon, and EventReceiveSprite, respectively.LocEventGen generates events, EventReceiveRibbon generates ribbon particles based on events, and EventReceiveSprite generates sprite particles based on events.
9.
Three Emitters
First, work on the LocEventGen stack.
10.
Spawn Rate
Click on the
+ sign to the right of the Emitter Update to add the Spawn Rate module.Spawn Rate: Number of particles per second to spawn. 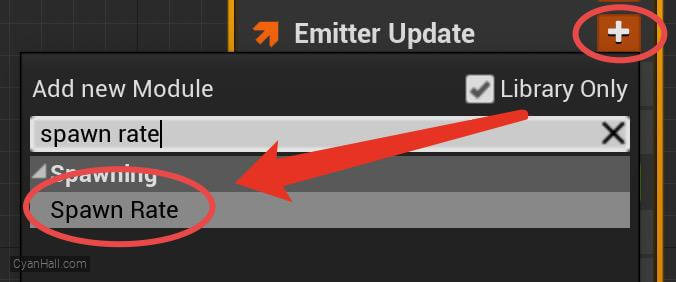
11.
Spawn Rate
Set the
Spawn 1.333 particle per second.
Spawn Rate value to 1.333.Spawn 1.333 particle per second.

12.
Initialize Particles
Select
1.
2.
3.
Initialize Particles and set:1.
Lifetime Mode is Random, then set the minimum value to 3.0 and the maximum value to 3.52.
Color Mode is Direct Set3.
Sprite Size Mode is Uniform and has a value of 14.0 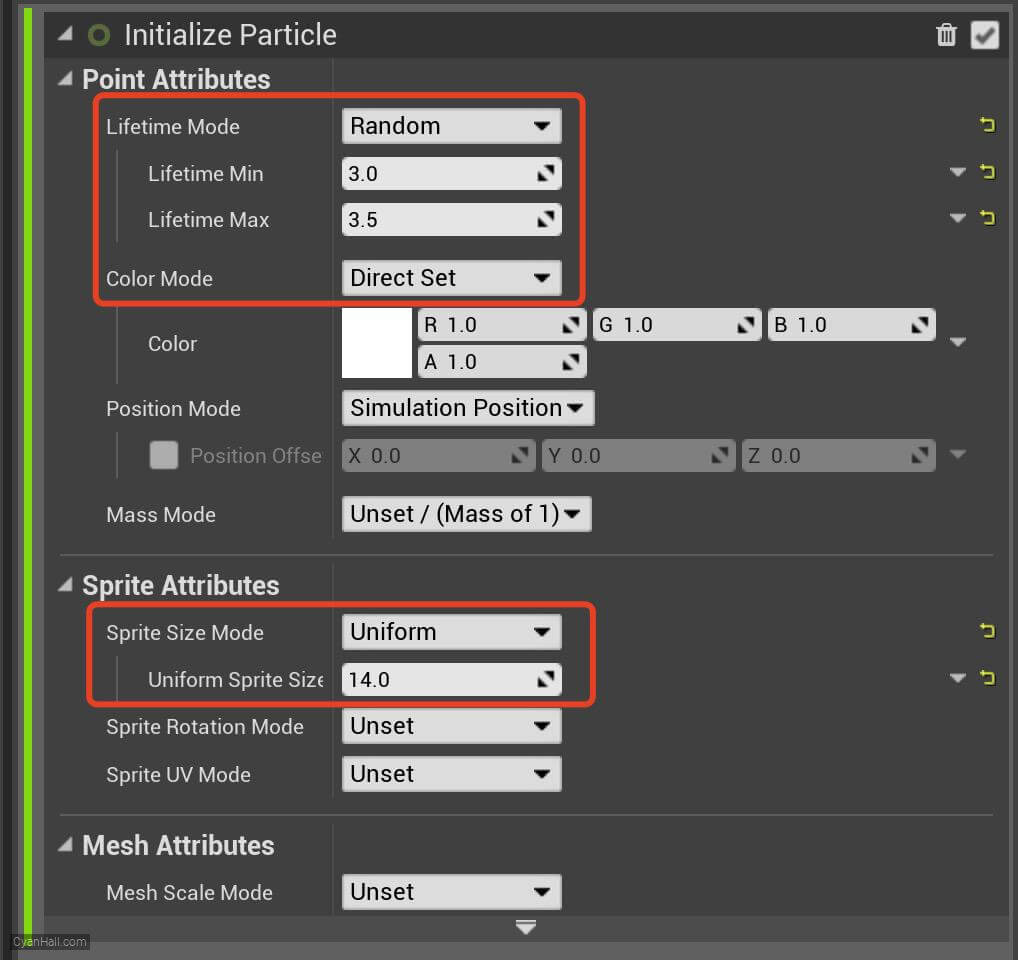
13.
Sphere Location
Add the
Sphere Location module in the Particles Spawn section. 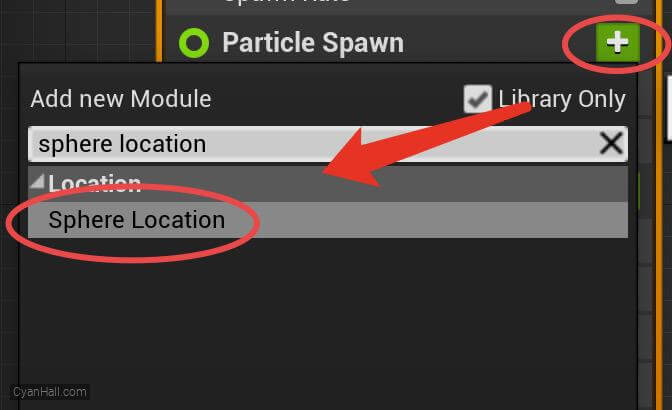
14.
Sphere Radius
Set
Sphere Radius to 8.0 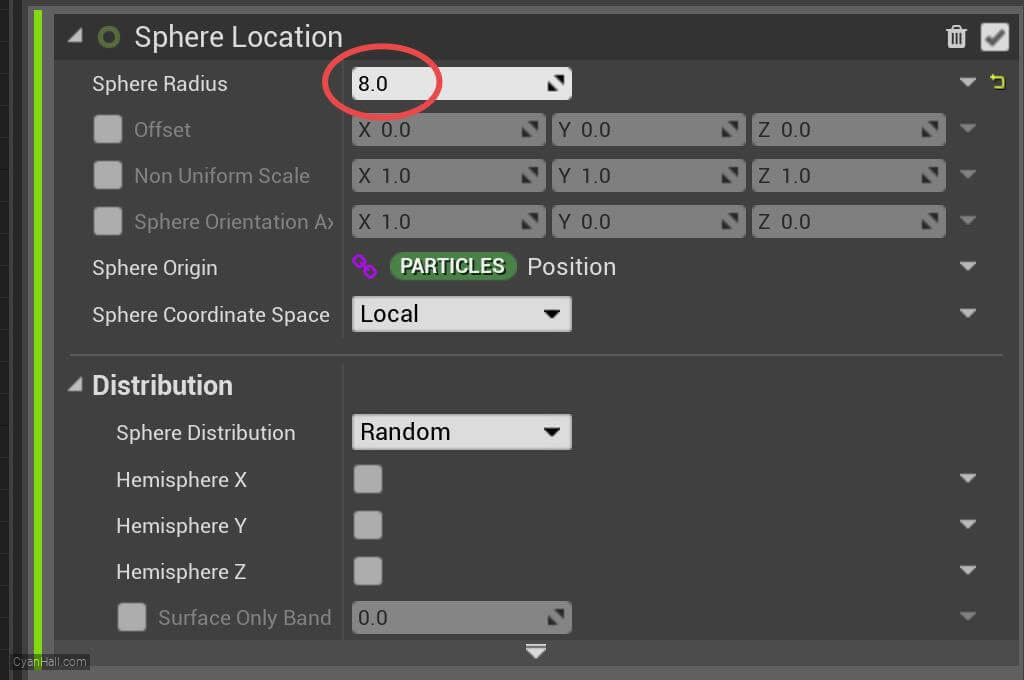
15.
Add Velocity in Cone
Add
Add Velocity in Cone module to the Particle Spawn section. 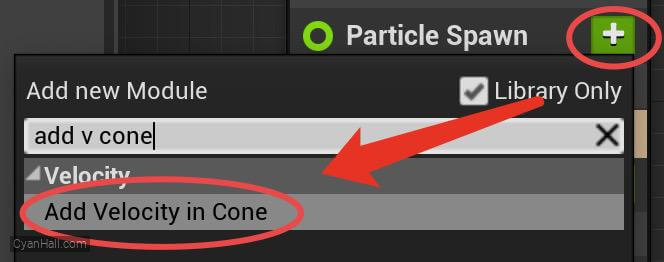
16.
Add Velocity in Cone
Click the first
Fix issue button to add its dependency on the SolveForcesAndVelocity module. 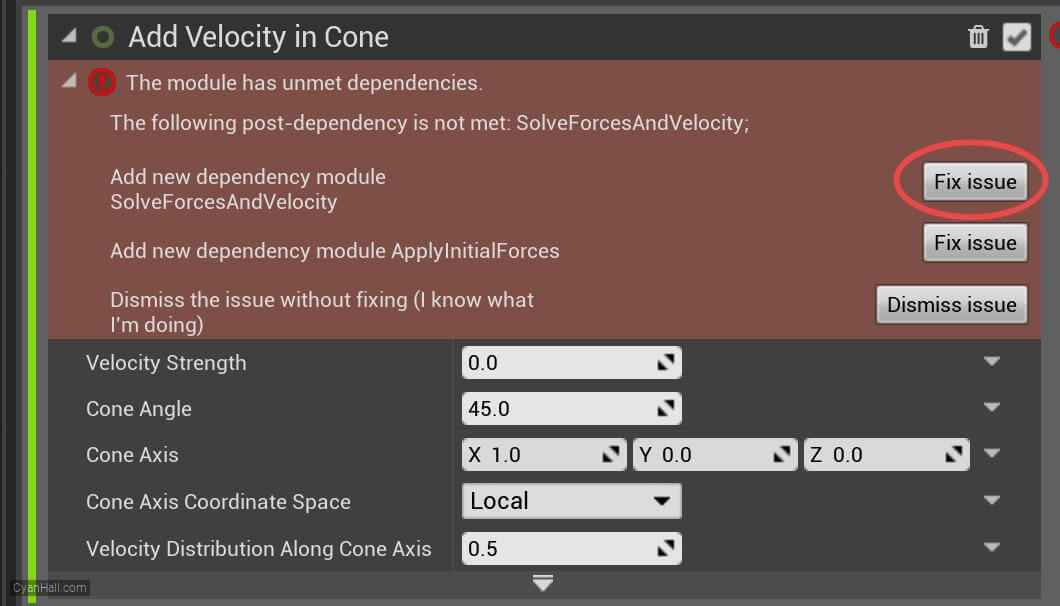
17.
Add Velocity in Cone
Set the value type of
Velocity Strength to Random Range Float 
18.
Add Velocity in Cone
1. Set Velocity Strength to a minimum value of
2. Set the Cone Angle to
3. Set the Cone Axis to
165.0 and a maximum value of 350.0.2. Set the Cone Angle to
36.0.3. Set the Cone Axis to
(0, 0, 1). 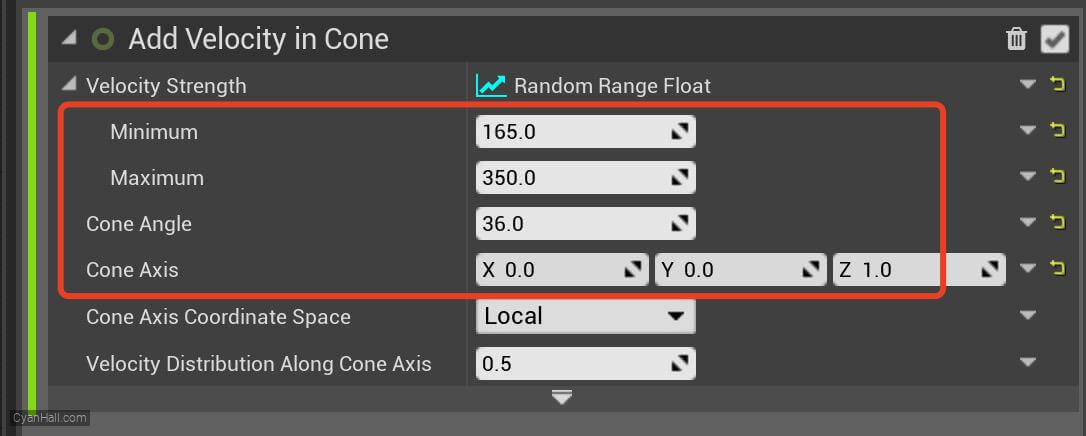
19.
Gravity Force
Set the value of
Gravity to (0, 0, -300). 
20.
Gravity Force
Click the first
Fix issue button to fix the SolveForcesAndVelocity module's dependency order issue. 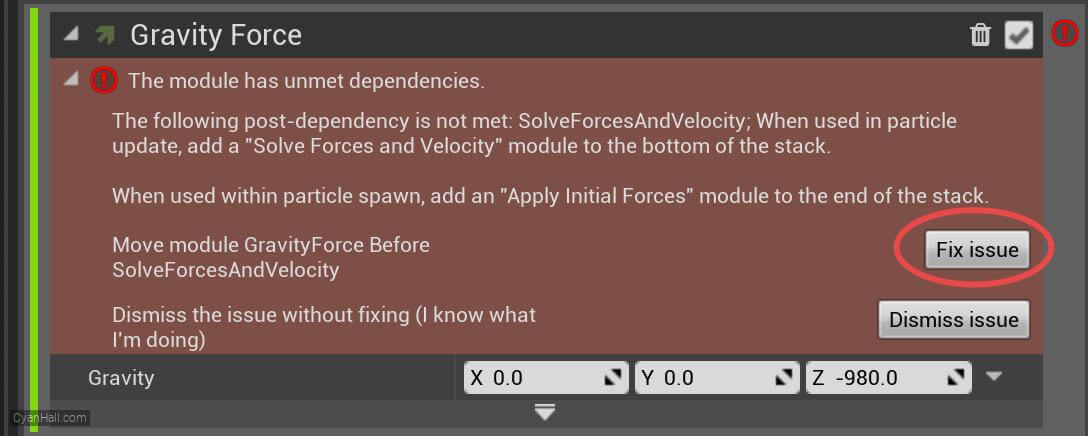
21.
Gravity Force
Set the value of
Gravity to (0, 0, -300).
22.
Generate Location Event
Add
Generate Location Event module to the Particle Update section. 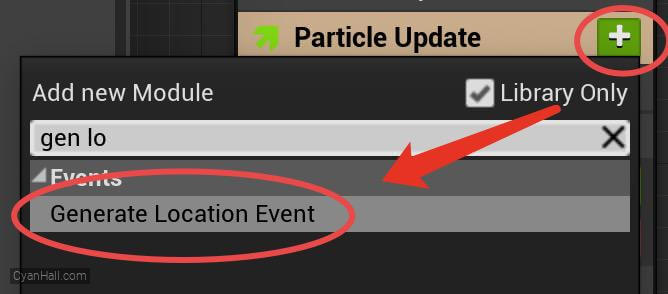
23.
Persistent IDs
Check
Requires Persistent IDs to obtain persistent IDs so that the generated events can be received by other emitters. 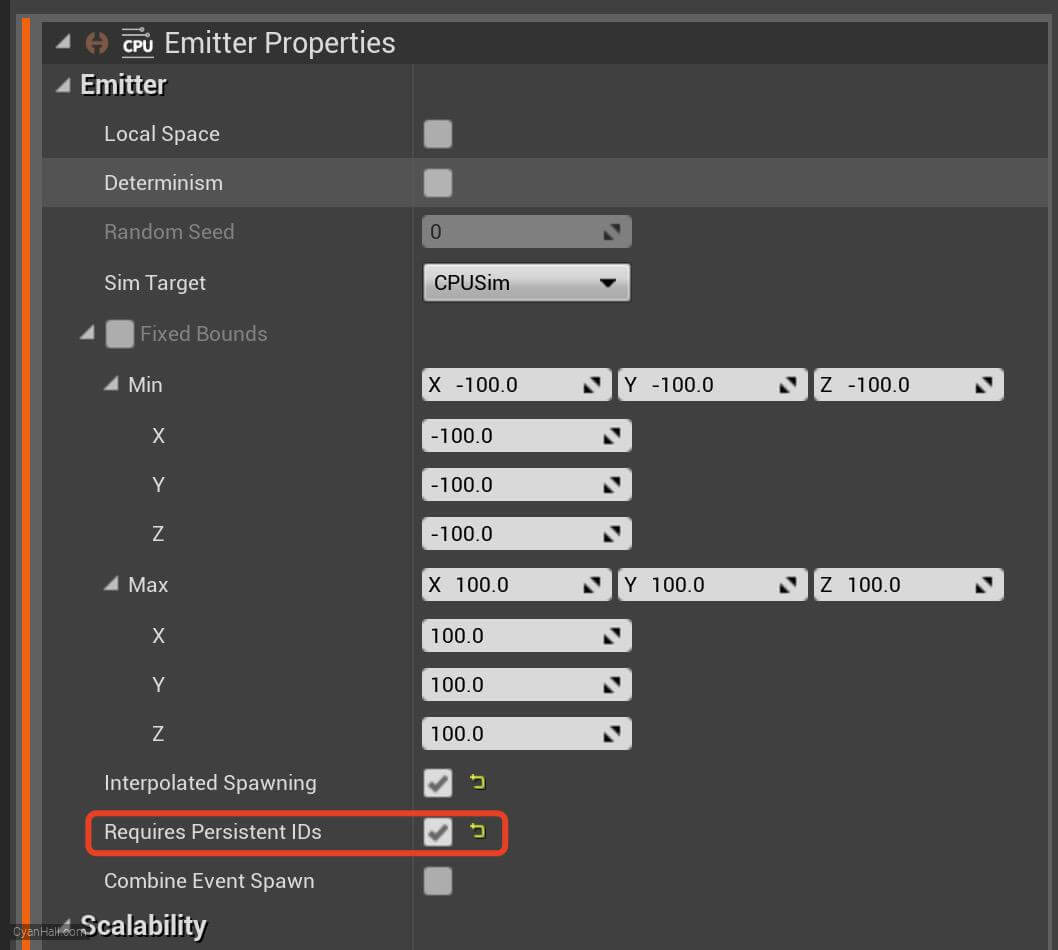
24.
Three Emitters
Next, work on the EventReceiveRibbon stack.
25.
Initialize Ribbon
Add
Initialize Ribbon module to the Particle Spawn section. 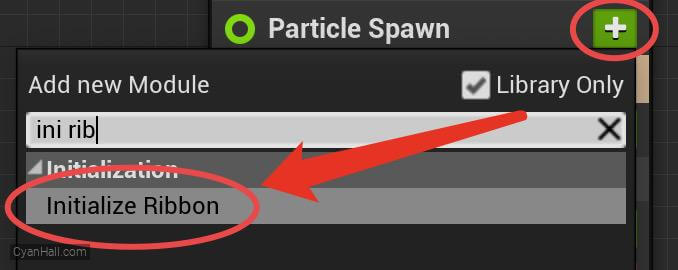
26.
Color
Add
Color module to the Particle Update section. 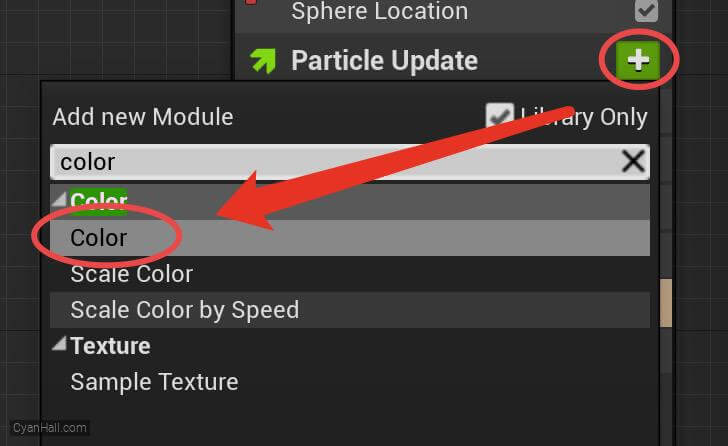
27.
Color
Set the value type of
Color to Color from Curve 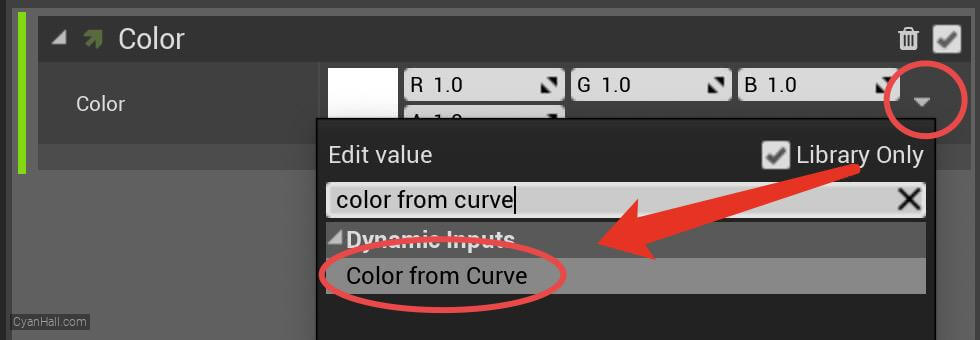
28.
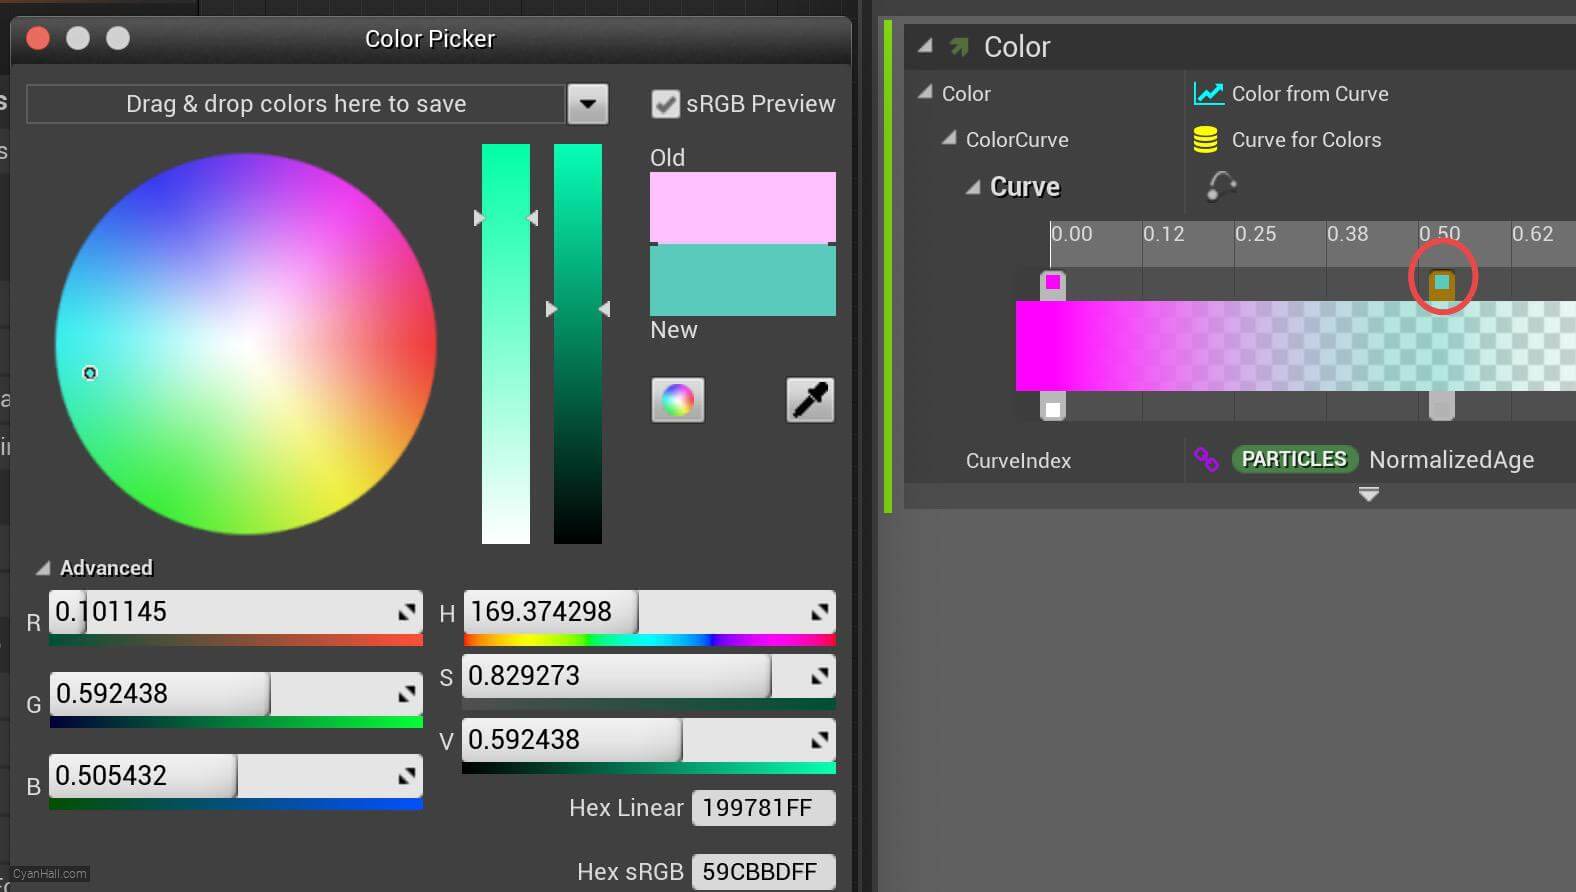
Color
Double-click the red circled dot and select a color
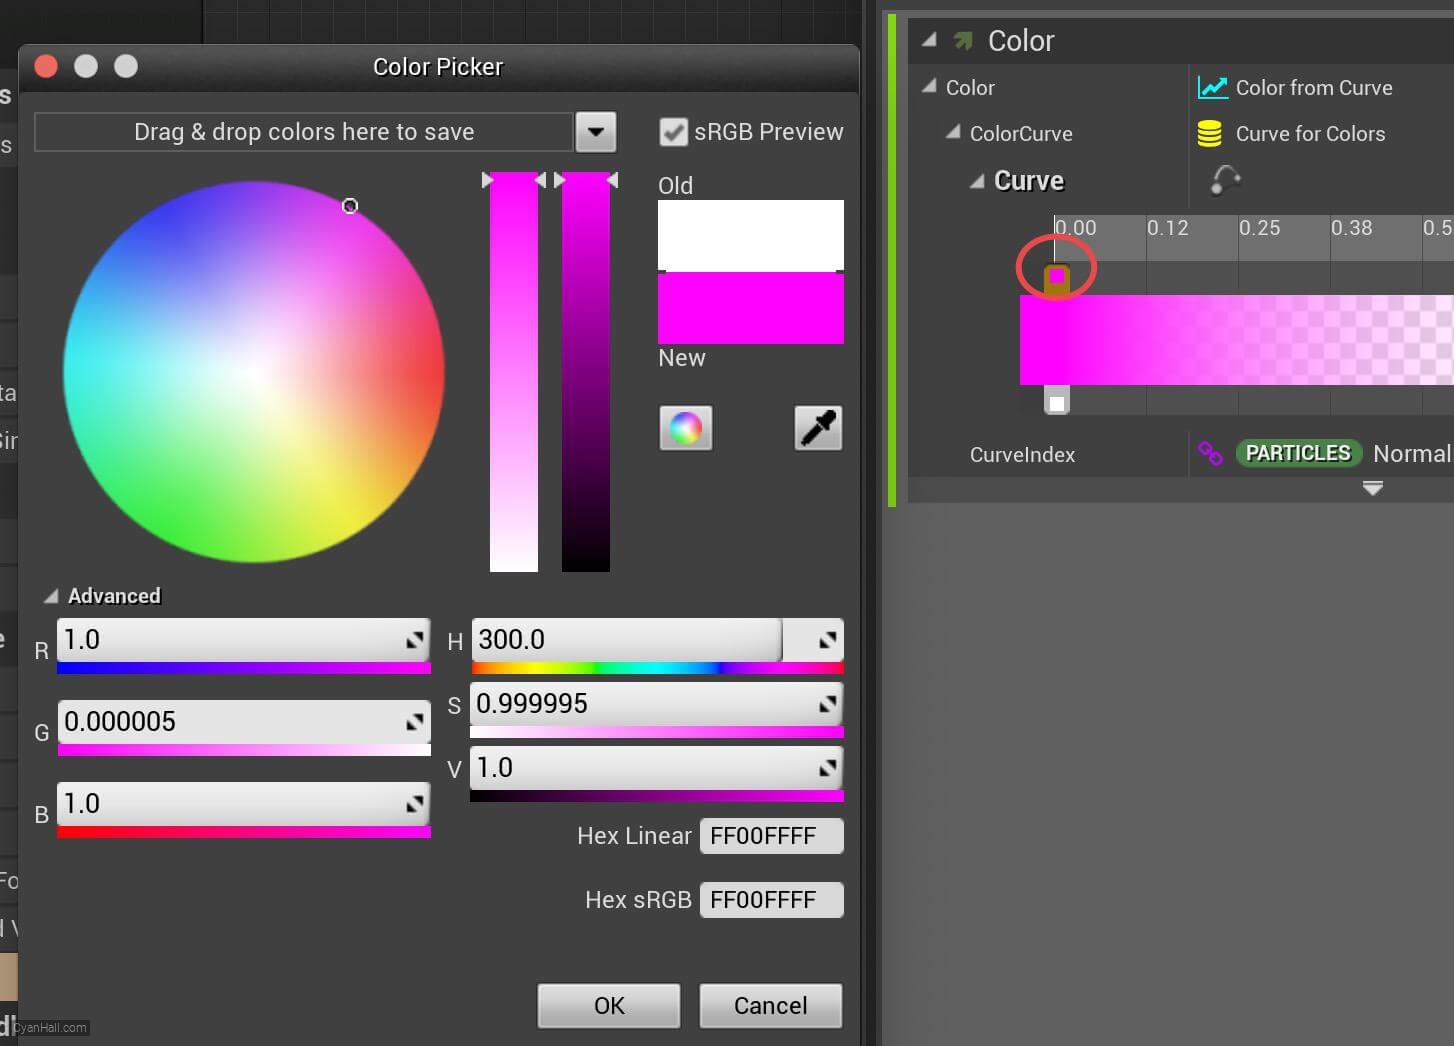
29.
Color
At the location of the small red circle, right click and select
Add key to all curve 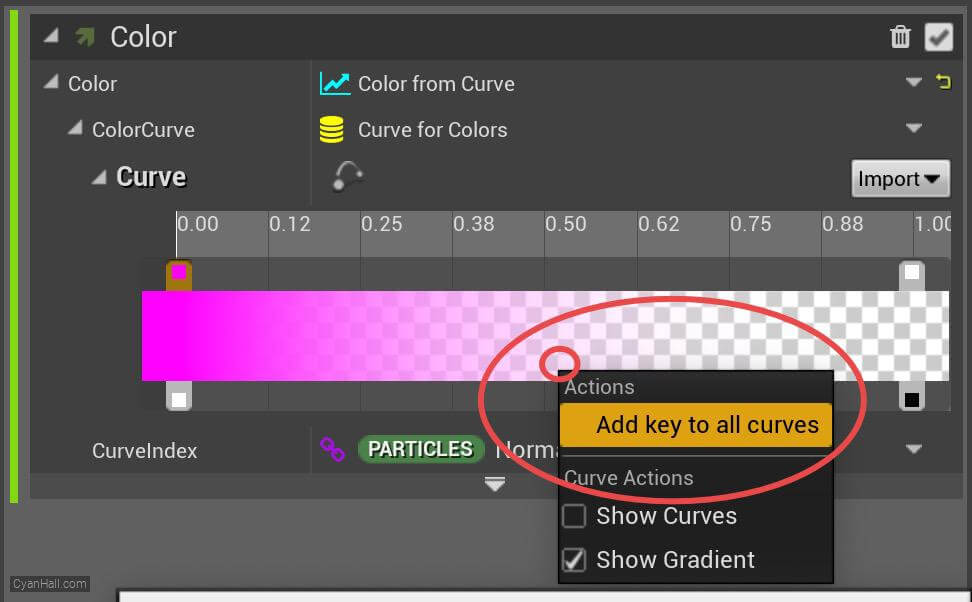
30.
Color
Double-click on the dot in the red circle and select another color
31.
Event Handler
Click the
+ sign to add an event handler. 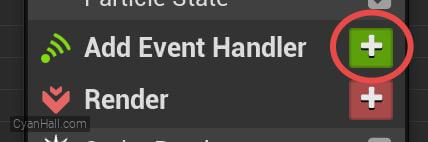
32.
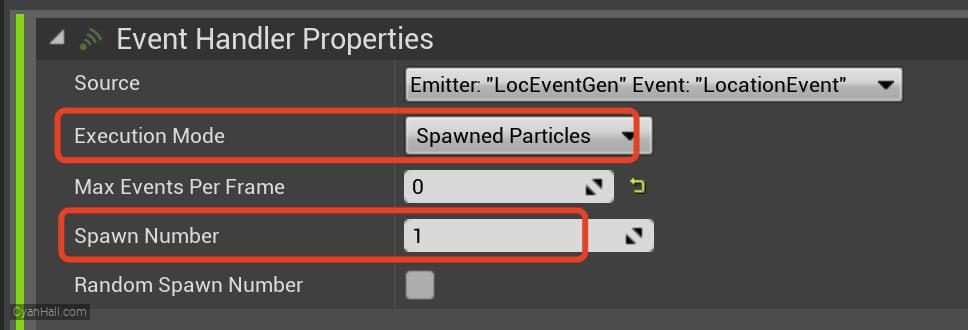
Event Handler
Set the event source to
LocEventGen.LocationEvent. 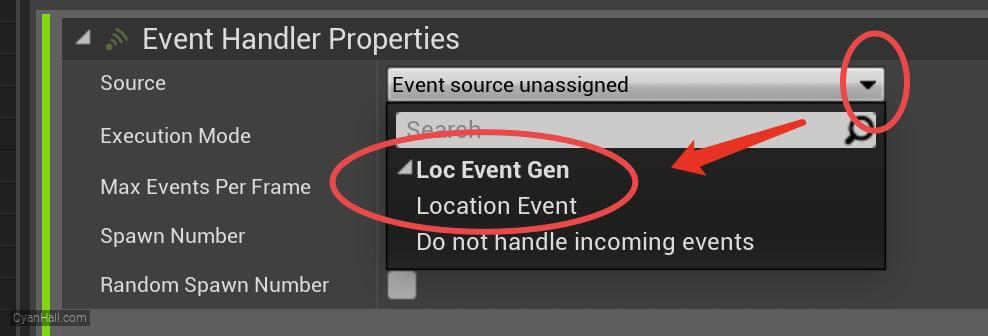
33.
Event Handler
1. Set Execution Mode to
2. Set Spawn Number to
Spawned Particles2. Set Spawn Number to
1. 
34.
Receive Location Event
Add
Receive Location Event module to the Event Handler section. 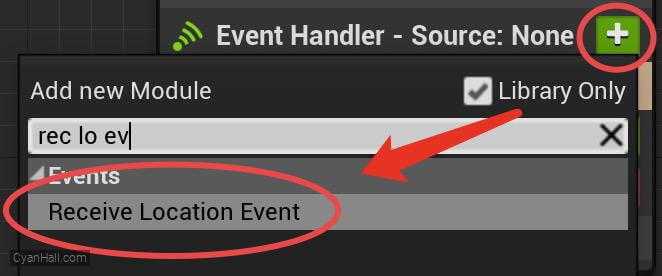
35.
Receive Location Event
Check
Inherit Parent Normalized Age. 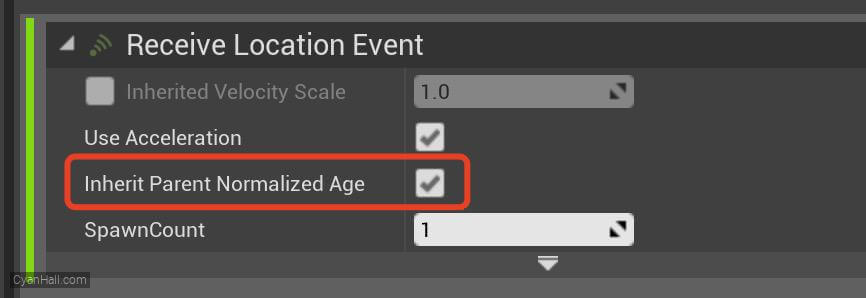
36.
Remove Sprite Renderer
Select
Sprite Renderer, right-click, and select Delete. 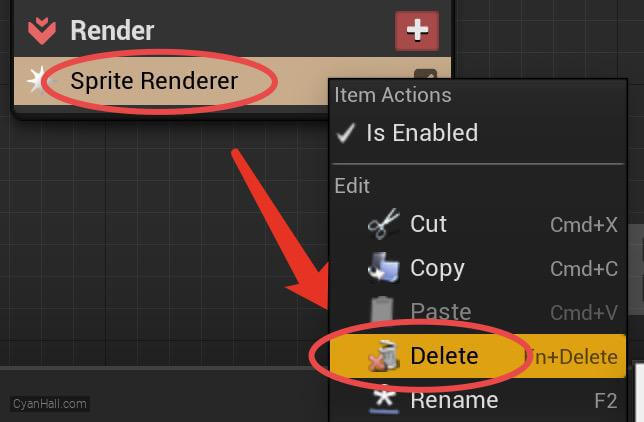
37.
Ribbon Renderer
Add
Ribbon Renderer module to the Render section. 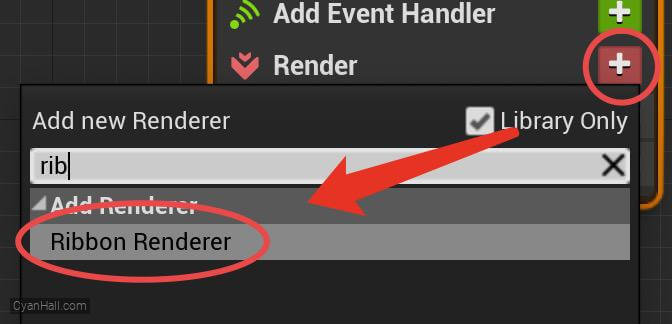
38.
Ribbon Renderer
Set the value of Material to
DefaultRibbonMaterial 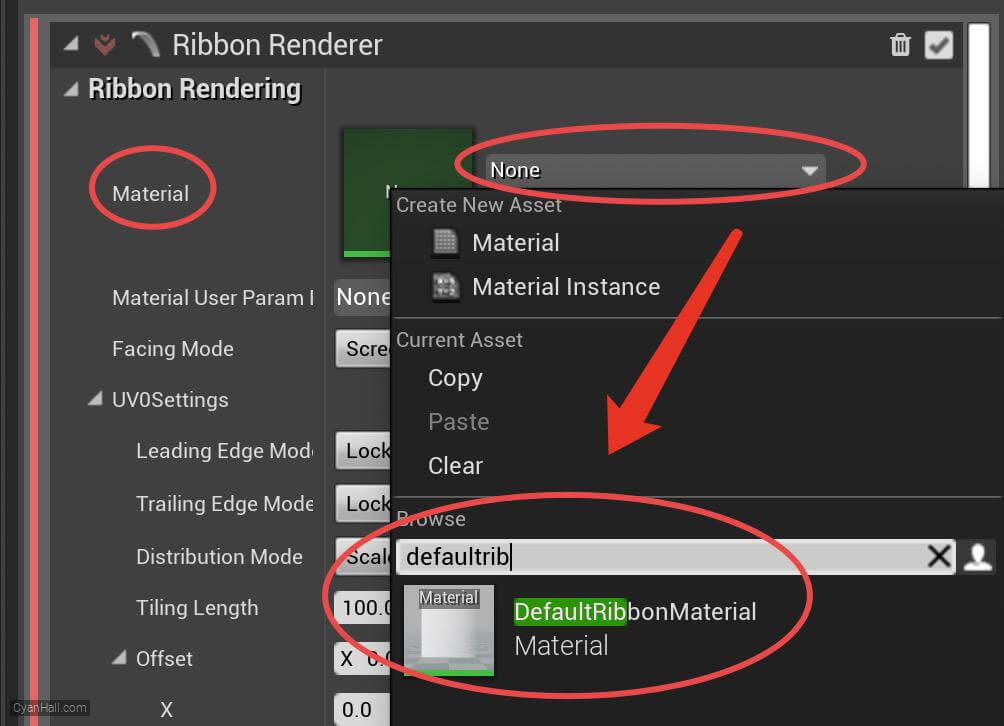
39.
Three Emitters
Last, work on the EventReceiveSprite stack.
40.
Initialize Particles
Select
1.
2.
Initialize Particles and set:1.
Lifetime Mode to Random, then set the minimum value to 0.875 and the maximum value to 1.252.
Color Mode as Direct Set3. Sprite Size Mode is Random Uniform and has a minimum value of 2.5 and a maximum value of 6.0. 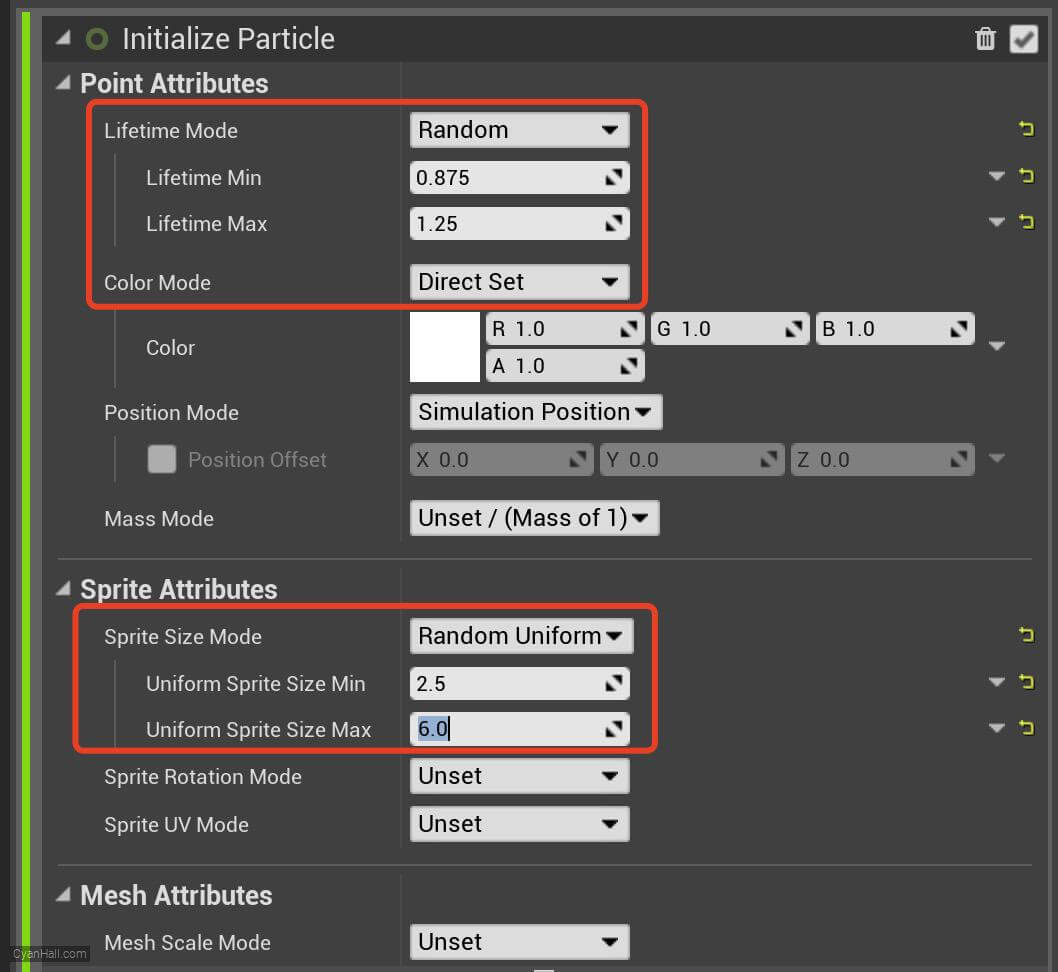
41.
Add Velocity
Add
Add Velocity module to the Particle Spawn section. 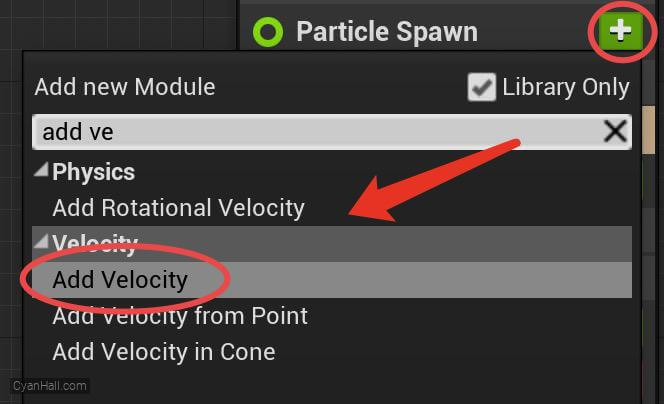
42.
Add Velocity
Click the first
Fix issue button to add its dependency on the SolveForcesAndVelocity module. 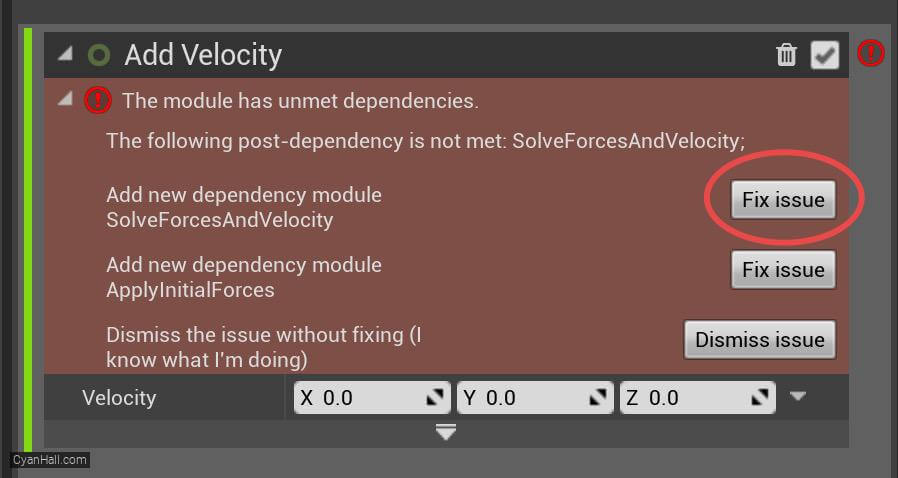
43.
Add Velocity
Set the value type of
Velocity to Random Range Vector 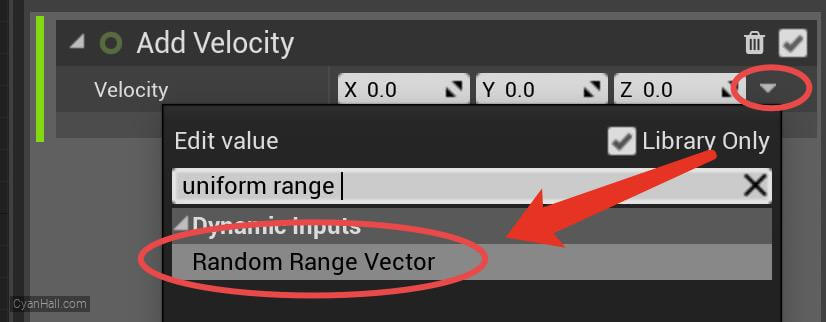
44.
Add Velocity
Set the minimum value to
(-32, -32, -32) and the maximum value to (32, 32, 32). 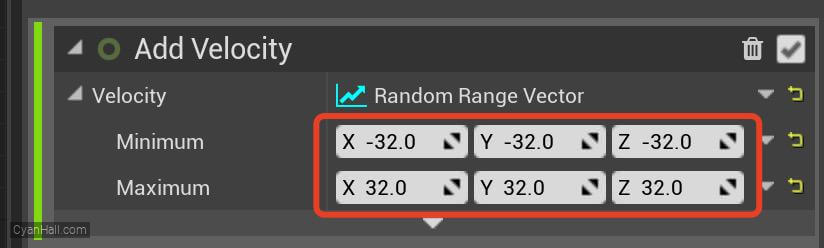
45.
Gravity Force
Set the value of
Gravity to (0, 0, -300).
46.
Gravity Force
Click the first
Fix issue button to fix the SolveForcesAndVelocity module's dependency order issue.
47.
Gravity Force
Set the value of
Gravity to (0, 0, -250). 
48.
Color
Add
Color module to the Particle Update section.
49.
Color
Set the value type of
Color to Color from Curve
50.
Color
Double-click the red circled dot and select a color
51.
Color
At the location of the small red circle, right click and select
Add key to all curve
52.
Color
Double-click on the dot in the red circle and select another color
53.
🎉 Finish! 🎉
👉 Star me if it’s helpful.
Support Me: Patreon
Follow Me: Twitter, Reddit, Zhihu, Bilibili
Support Me: Patreon
Follow Me: Twitter, Reddit, Zhihu, Bilibili