Version: 4.26, 中文
Created: 2021-01-30, Updated: 2021-03-25
Author: Cyanhall
👉 Star me if it’s helpful.
Created: 2021-01-30, Updated: 2021-03-25
Author: Cyanhall
👉
1.
Preparation
This is the effect we are going to make in this tutorial.
Note: The main content of this tutorial comes from the
Tip: Use ⬆️ ⬇️ to turn the page up and down. We recommend browsing with a large screen for a better reading experience.
Note: The main content of this tutorial comes from the
Content Examples that come with Unreal EngineTip: Use ⬆️ ⬇️ to turn the page up and down. We recommend browsing with a large screen for a better reading experience.

Full Tutorials:
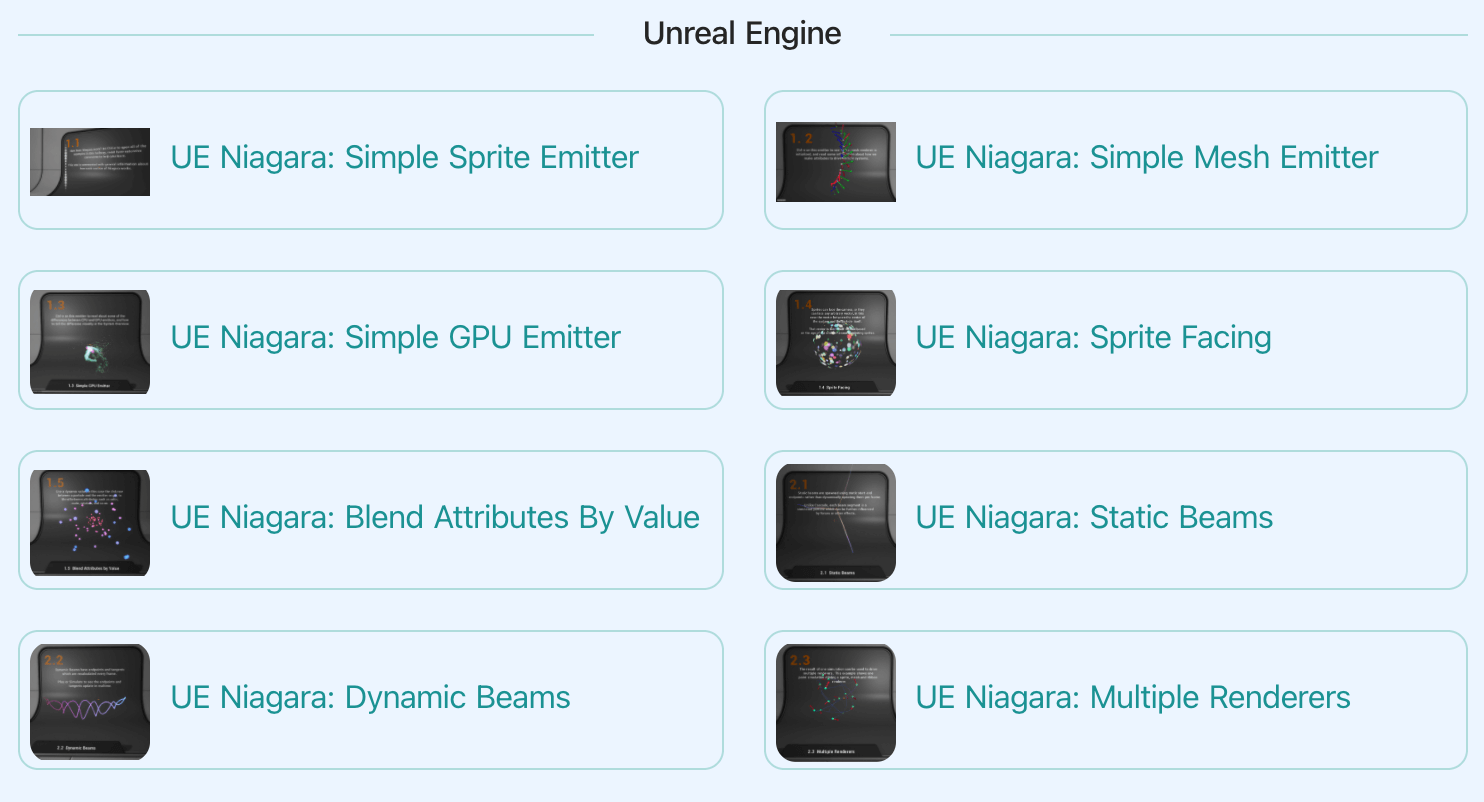
1. UE Niagara: Simple Sprite Emitter
2. UE Niagara: Simple Mesh Emitter
3. UE Niagara: Simple GPU Emitter
4. UE Niagara: Sprite Facing
5. UE Niagara: Blend Attributes By Value
6. UE Niagara: Static Beams
7. UE Niagara: Dynamic Beams
8. UE Niagara: Multiple Renderers
9. UE Niagara: Location Events
10. UE Niagara: Expressions
3.
Goal
In this example, Sprites face the vector between the center of the system and the particle itself.
That vector is then itself rotated based on the age of the emitter to create spinning sprites.
That vector is then itself rotated based on the age of the emitter to create spinning sprites.
4.
Let's start the reconstruction
Right click and select
FX => Niagara System to create. 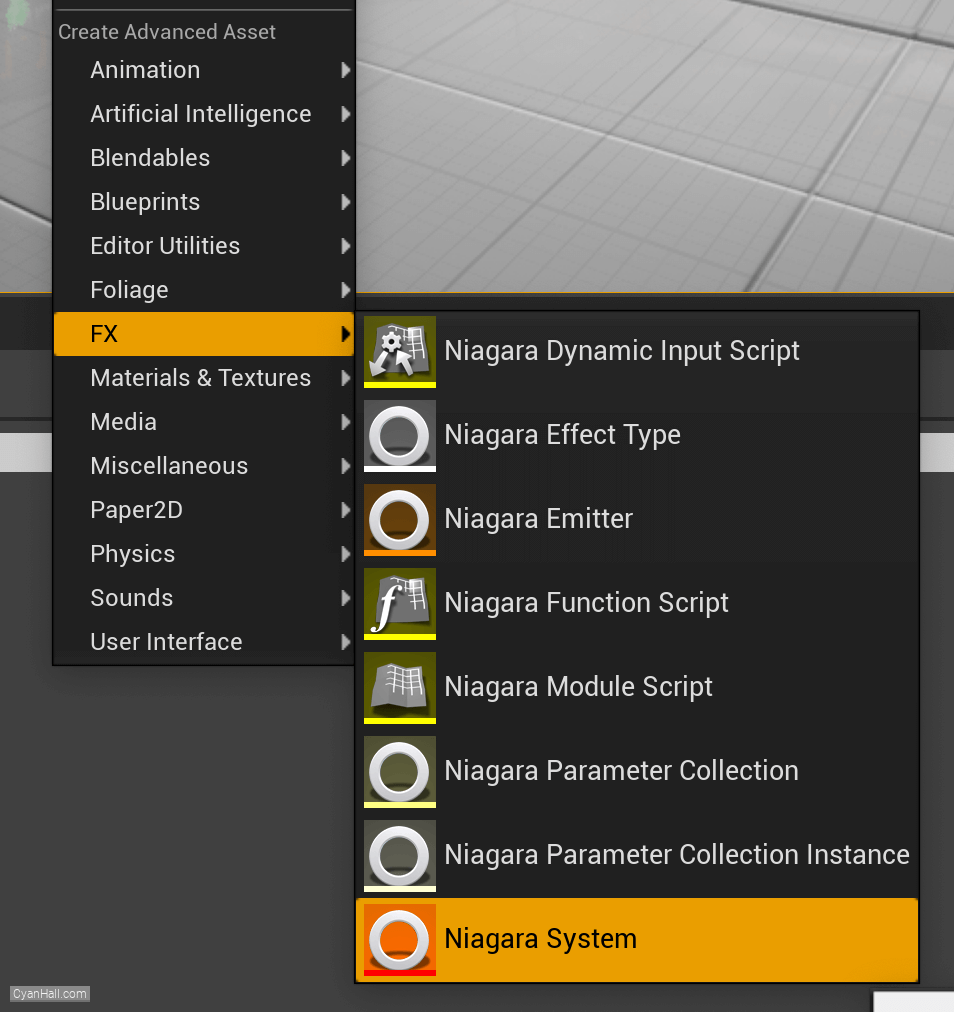
5.
Create Niagara System
Select
Empty template, click + and Finish 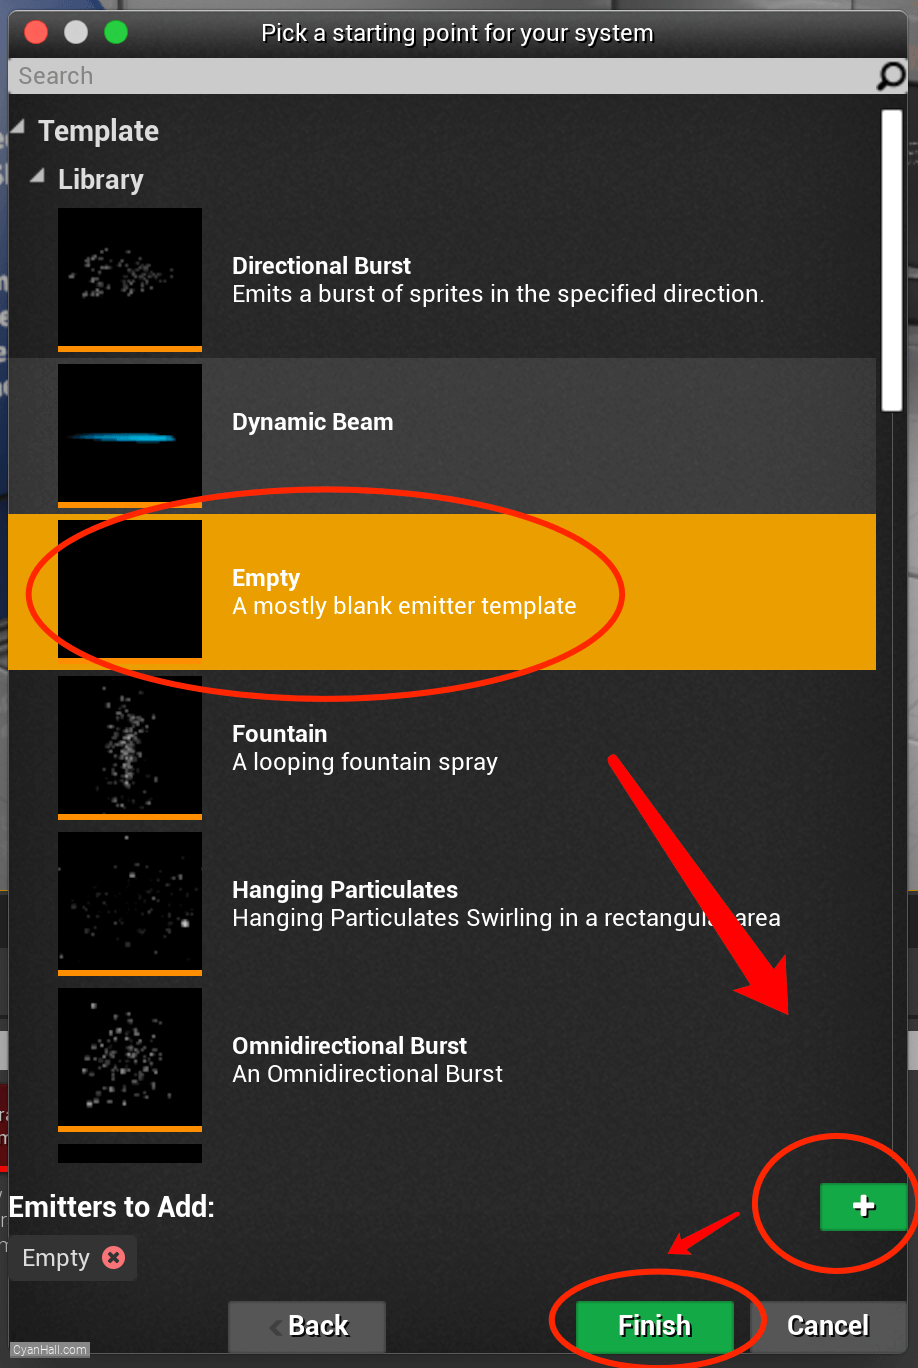
6.
Create Niagara System
As a result, we get a
Niagara System asset, click to open it. 
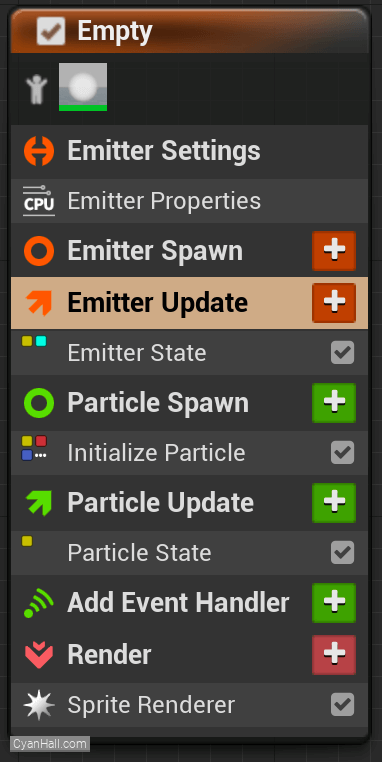
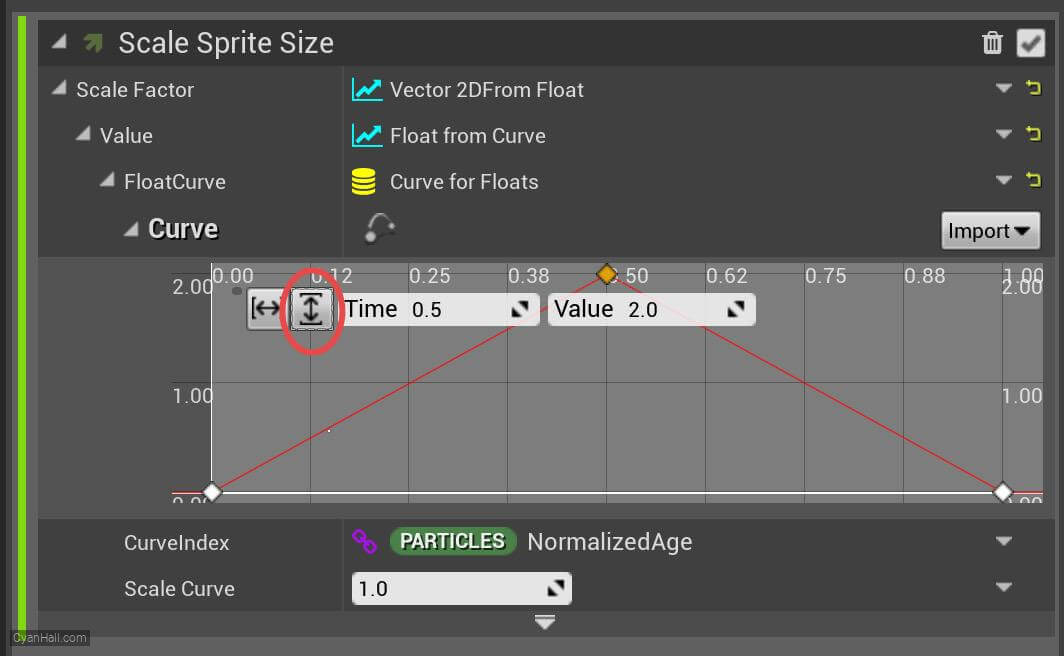
7.
Empty Niagara System
You can see that we have an empty Niagara system.
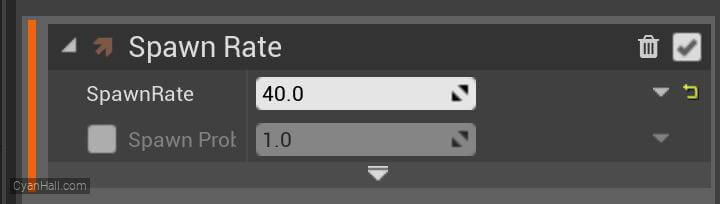
8.
Spawn Rate
Click on the
+ sign to the right of the Emitter Update to add the Spawn Rate module.Spawn Rate: Number of particles per second to spawn. 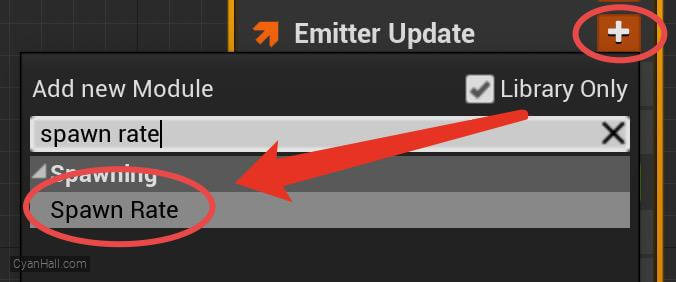
9.
Spawn Rate
Set the
Spawn 40.0 particle per second.
Spawn Rate value to 40.0.Spawn 40.0 particle per second.
10.
SineWave
Click the
+ sign to the right of the Emitter Attributes to add a float attribute. 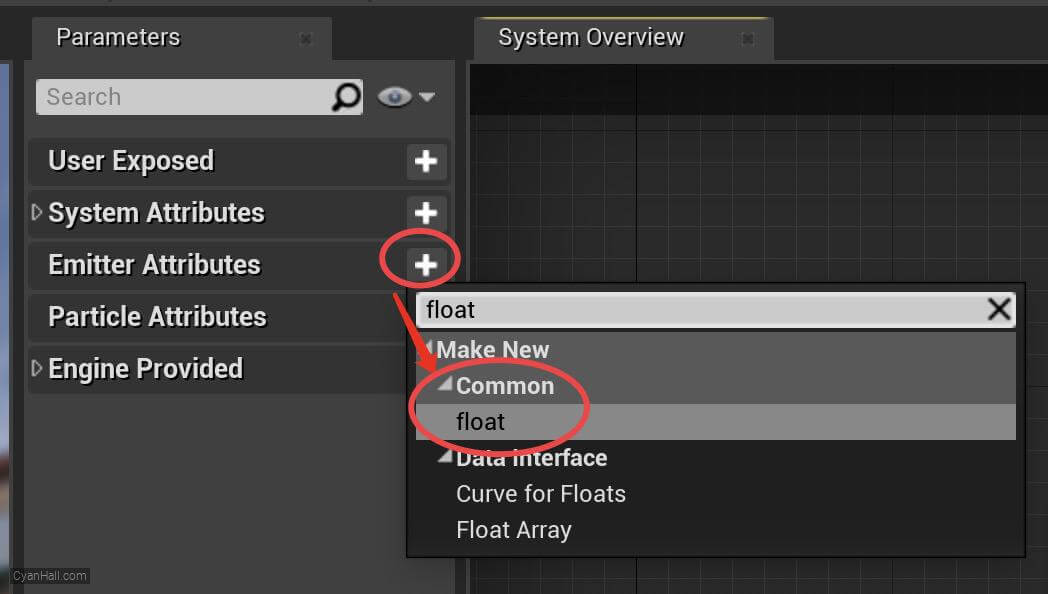
11.
SineWave
Name this new property
SineWave. 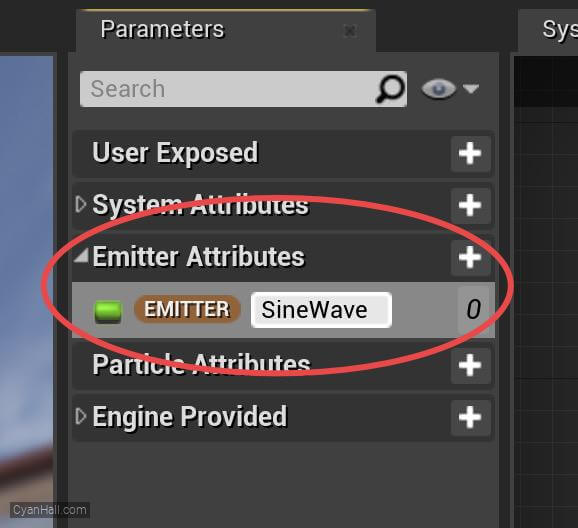
12.
SineWave
Drag this property under
If dragged into
By setting it in
Emitter Update.If dragged into
Emitter Spawn, its value would only be set once, on the first frame the emitter was born.By setting it in
Emitter update, that Attribute gets a new value every frame. 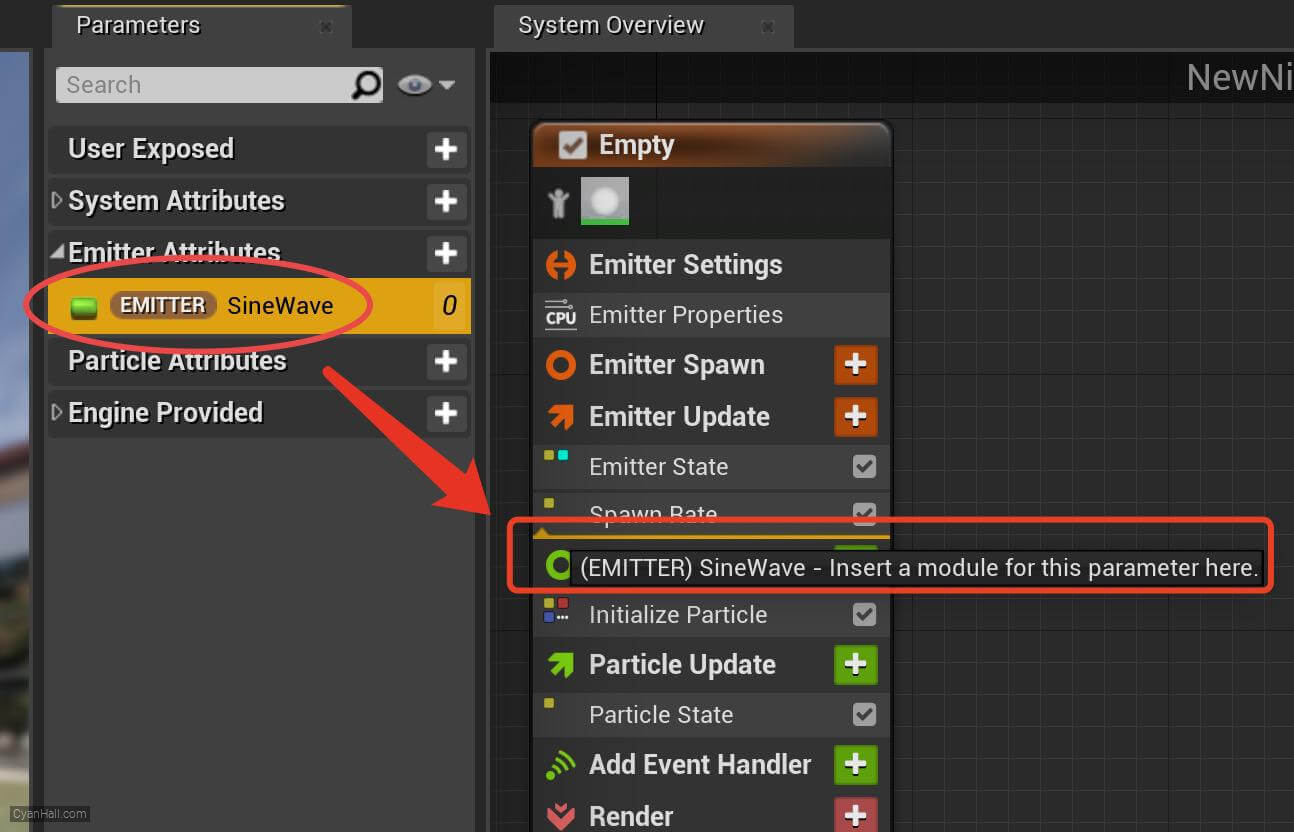
13.
SineWave
Because this is calculated at the emitter level and not per-particle, every particle which references it receives the same value, in this case allowing them all to spin at the same time.
The same concept works at the system level too: a variable set there is accesible to every emitter in the system, as well as every particle in those systems.
The same concept works at the system level too: a variable set there is accesible to every emitter in the system, as well as every particle in those systems.
14.
SineWave
Set the value type of
SineWave to Clamp FloatClamp Float: Clamp Float between min and max value. 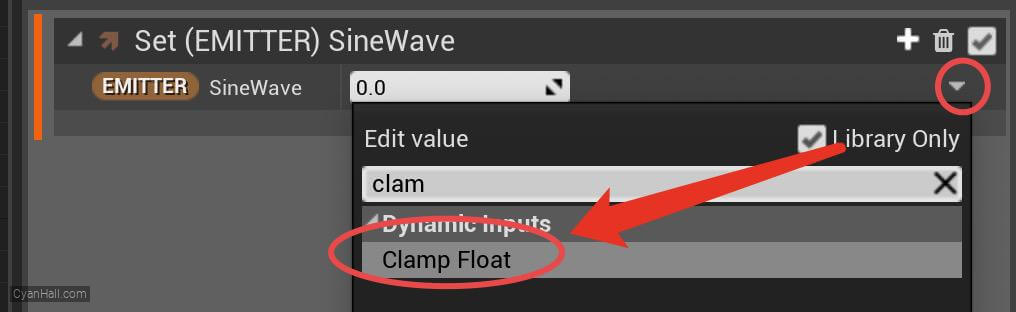
15.
SineWave
Set the value of
Float to Sine input. 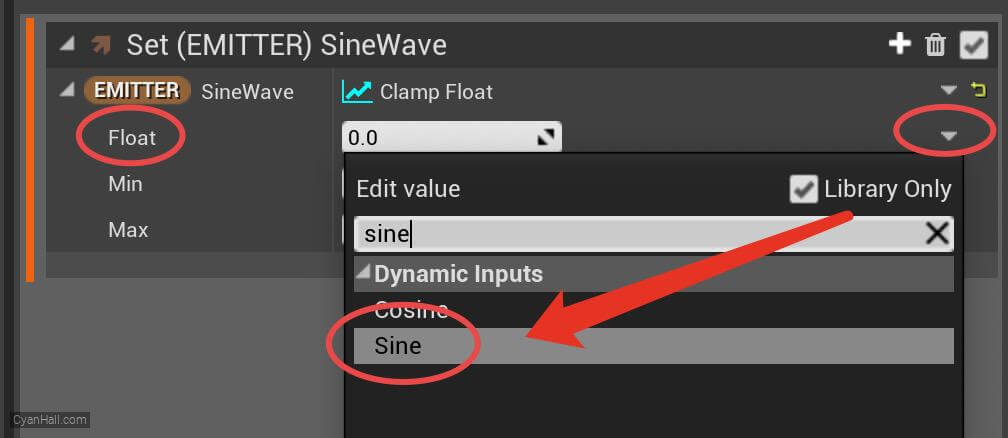
16.
SineWave
Set the value type of
Normalized Angle to Multiply Float 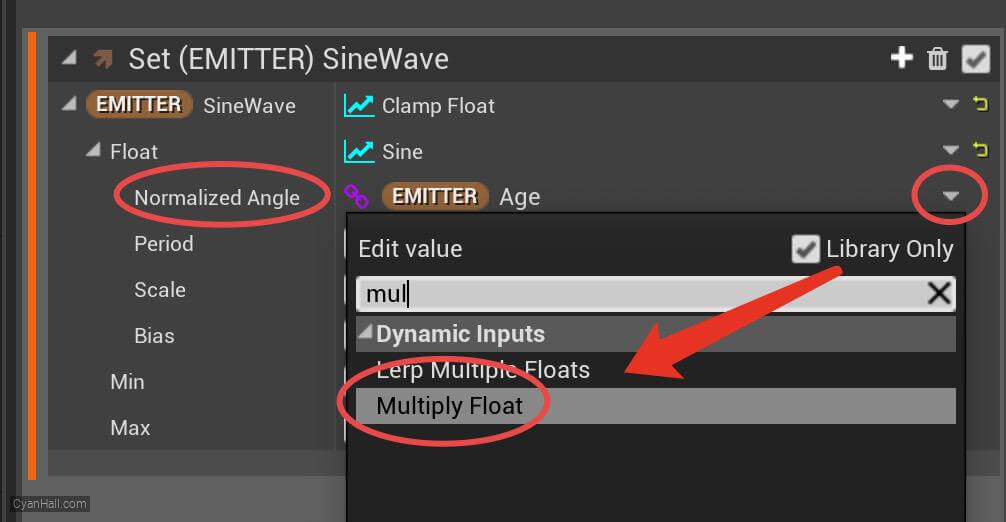
17.
SineWave
Sets the
A value of Normalized Angle to the Age of the emitter. 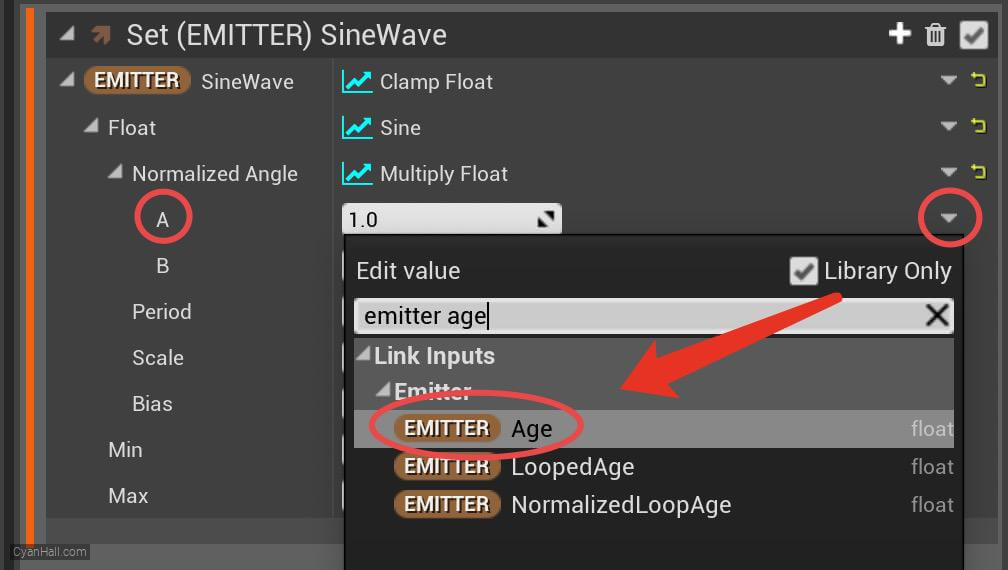
18.
SineWave
Set the
B value of Normalized Angle to 0.25. 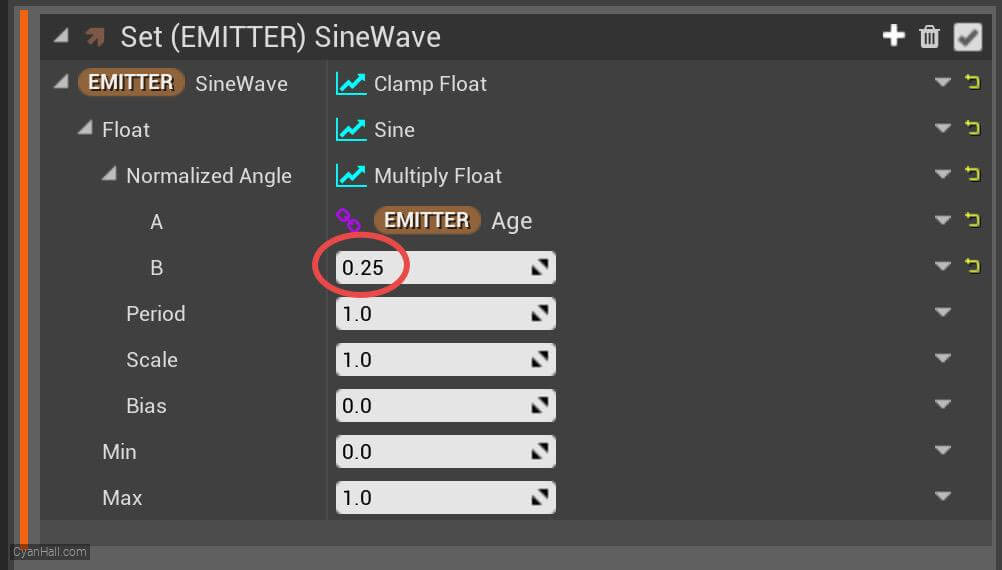
19.
Initialize Particles
Select
1.
2.
3.
4.
Initialize Particles and set:1.
Lifetime to 6.02.
Color Mode to Random Range3.
Color Channel Mode to Random Individual Channels4.
Sprite Size Mode is Random Uniform with a Min value of 6.0 and a Max value of 11.0. 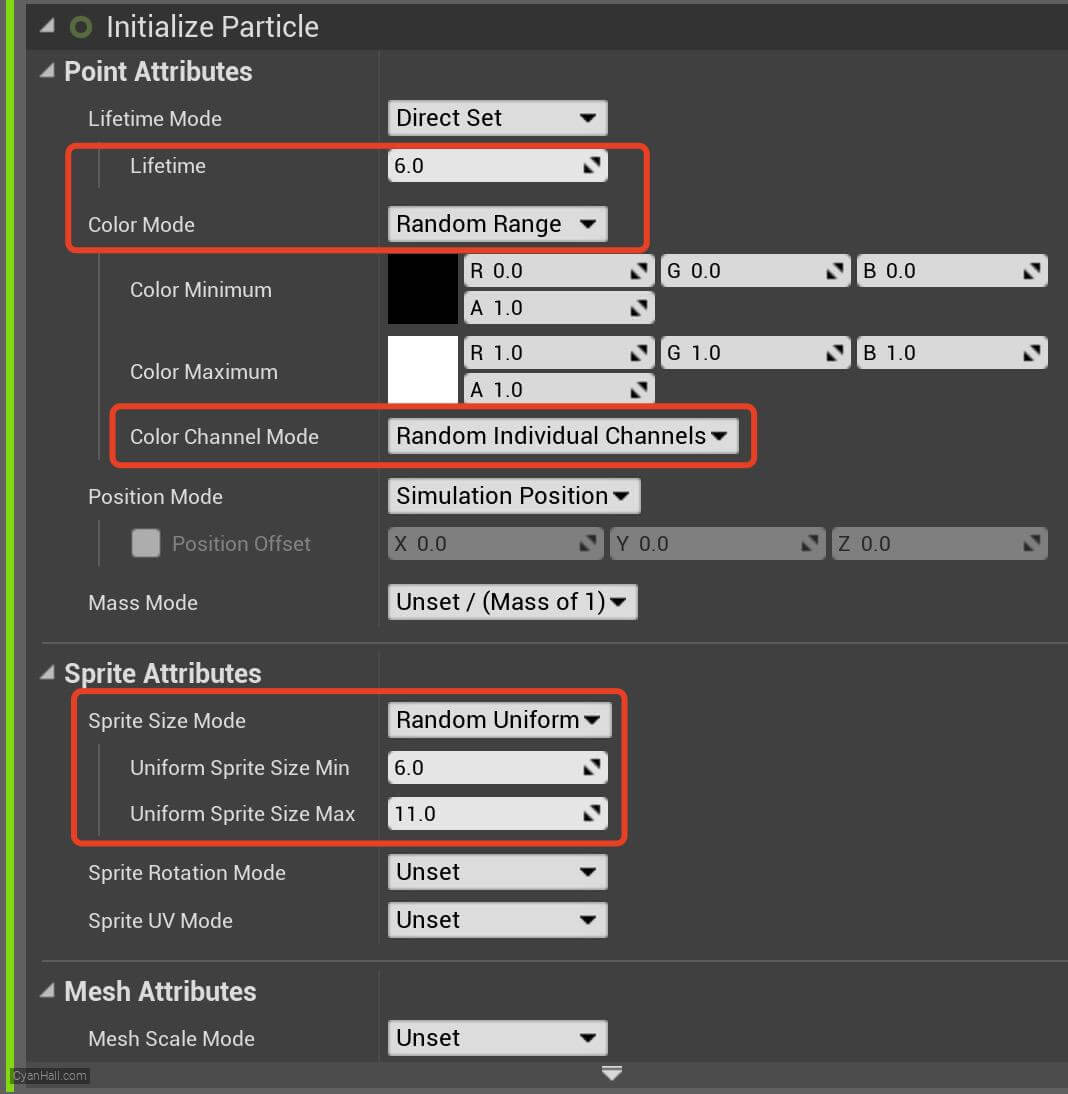
20.
Sphere Location
Add the
Sphere Location module in the Particles Spawn section. 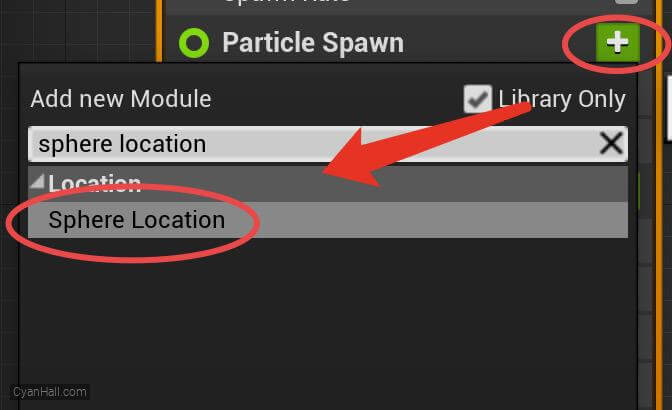
21.
Sphere Radius
Set
Sphere Radius to 95.0 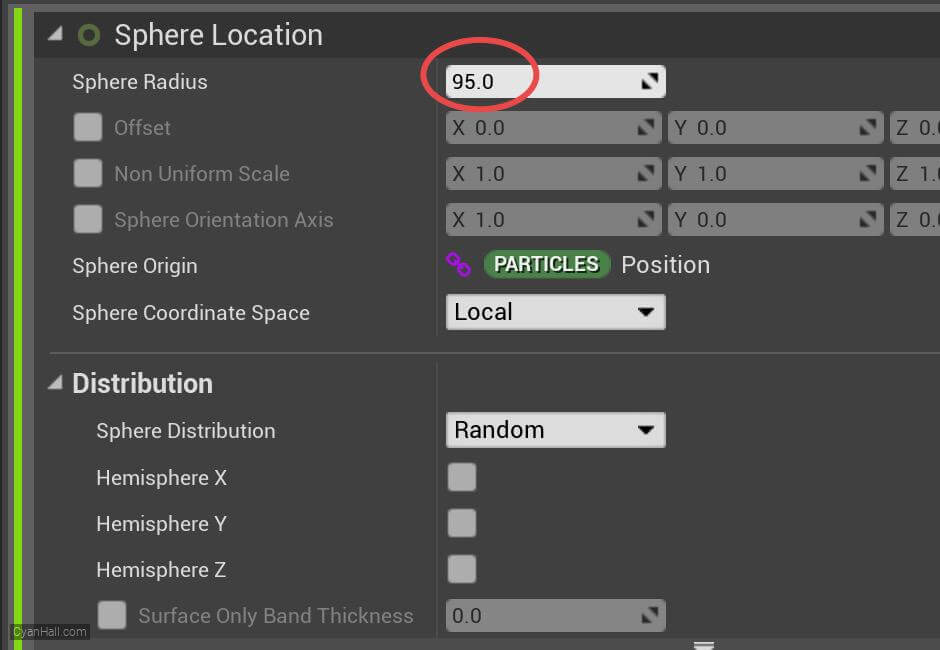
22.
FacingCenter
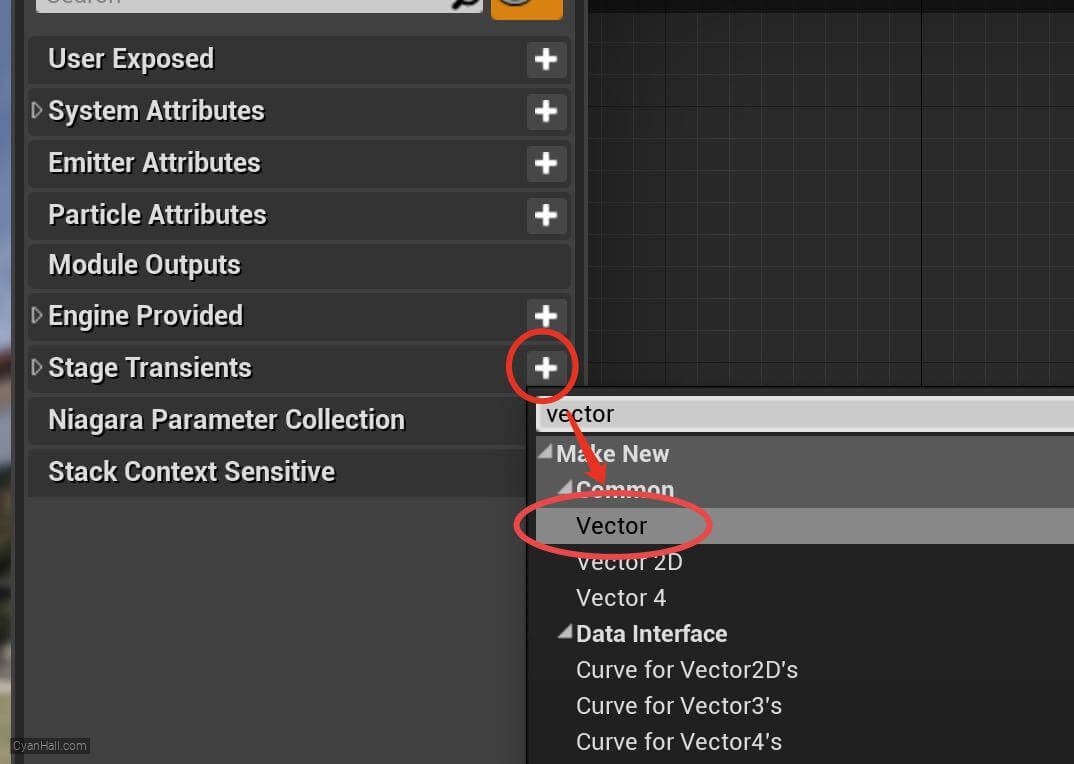
Add a
Note:
Stage Transients: A transient value which can be written to and read from any module. Transient values do not persist from frame to frame, or between stages, e.g. emitter to particle, or spawn to update.
Vector variable to the Stage Transients moduleNote:
Particle Attributes: Persistent attribute which is written in a particle stage and can be read in particle stages.Stage Transients: A transient value which can be written to and read from any module. Transient values do not persist from frame to frame, or between stages, e.g. emitter to particle, or spawn to update.
23.
FacingCenter
Name this newly created variable:
FacingCenter 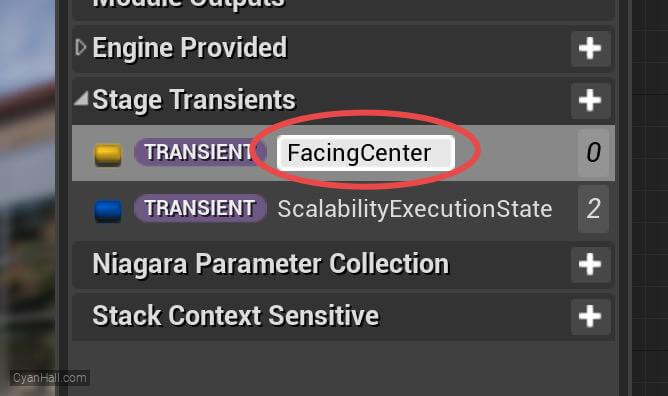
24.
FacingCenter
Drag and drop
FacingCenter to Particles Update. 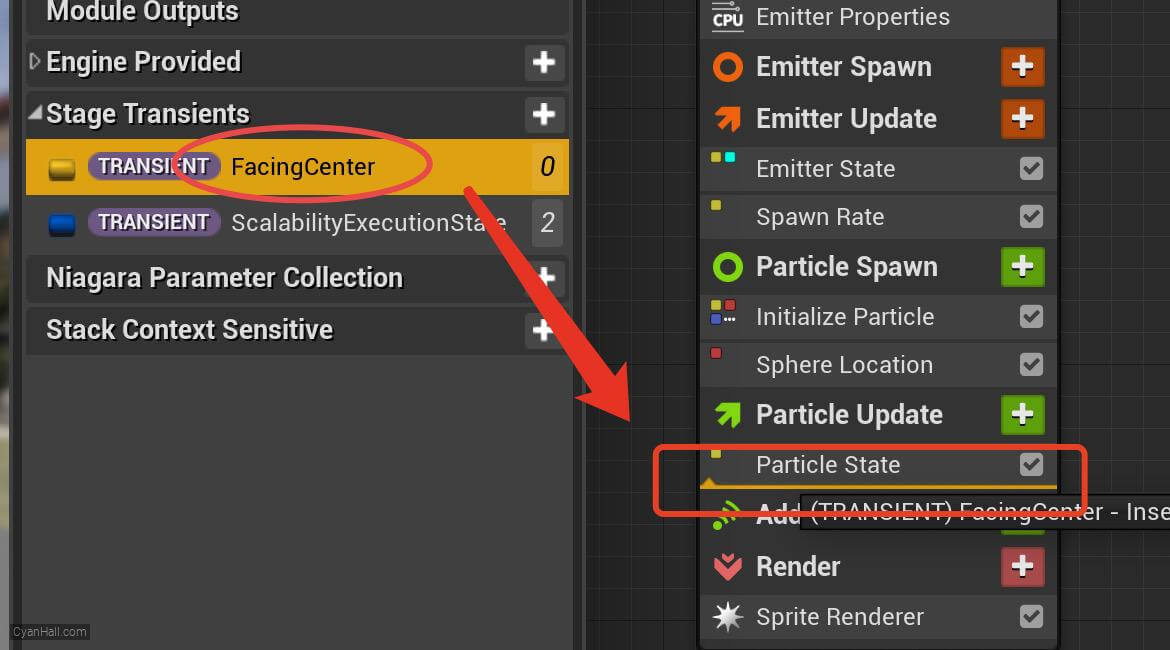
25.
FacingCenter
Set the value type of
FacingCenter to Subtract Vector 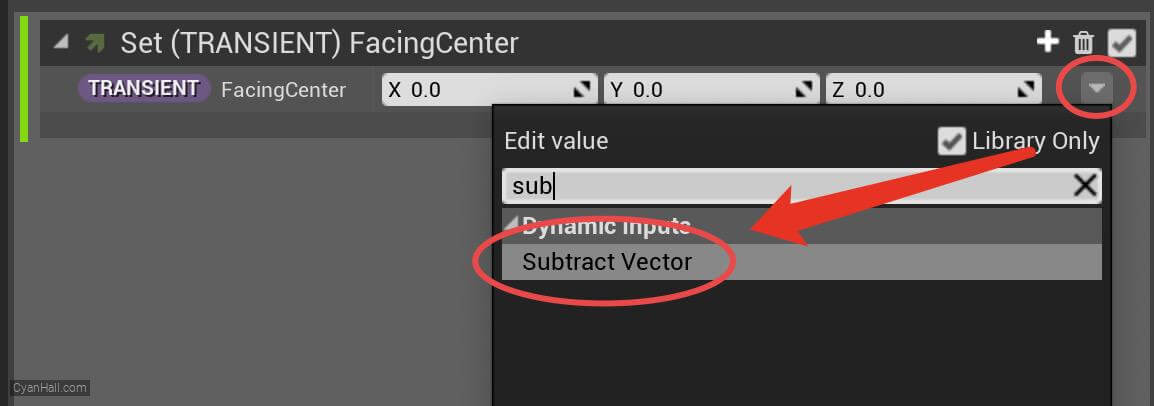
26.
FacingCenter
Edit the value of
A to Particles.Position 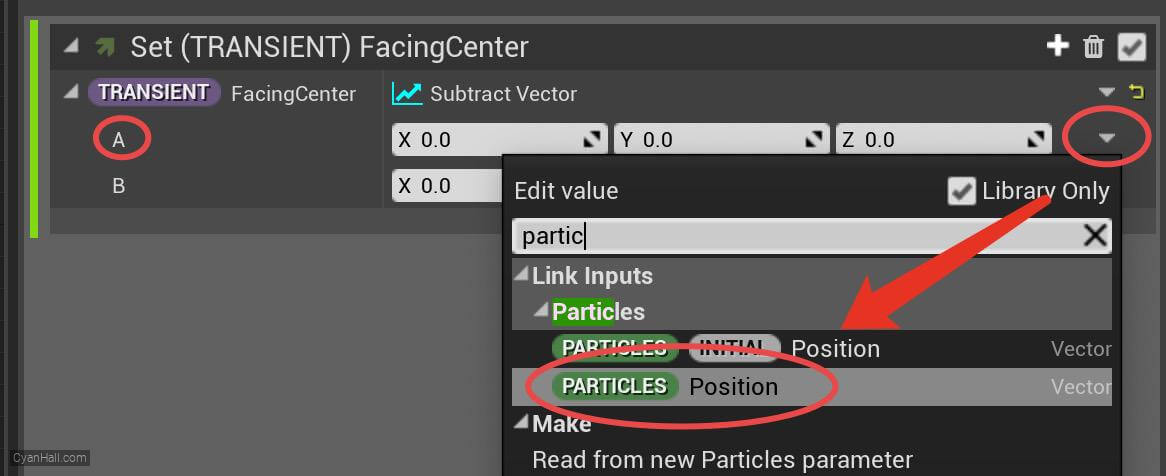
27.
FacingCenter
Edit the value of
A to Simulation Position Simulation Position: returns either the Engine.Owner.Position or the local (0, 0, 0) depending on the Local Space flag on the emitter. 
28.
SpriteFacing
Add a
Vector variable to the Particle Attributes module 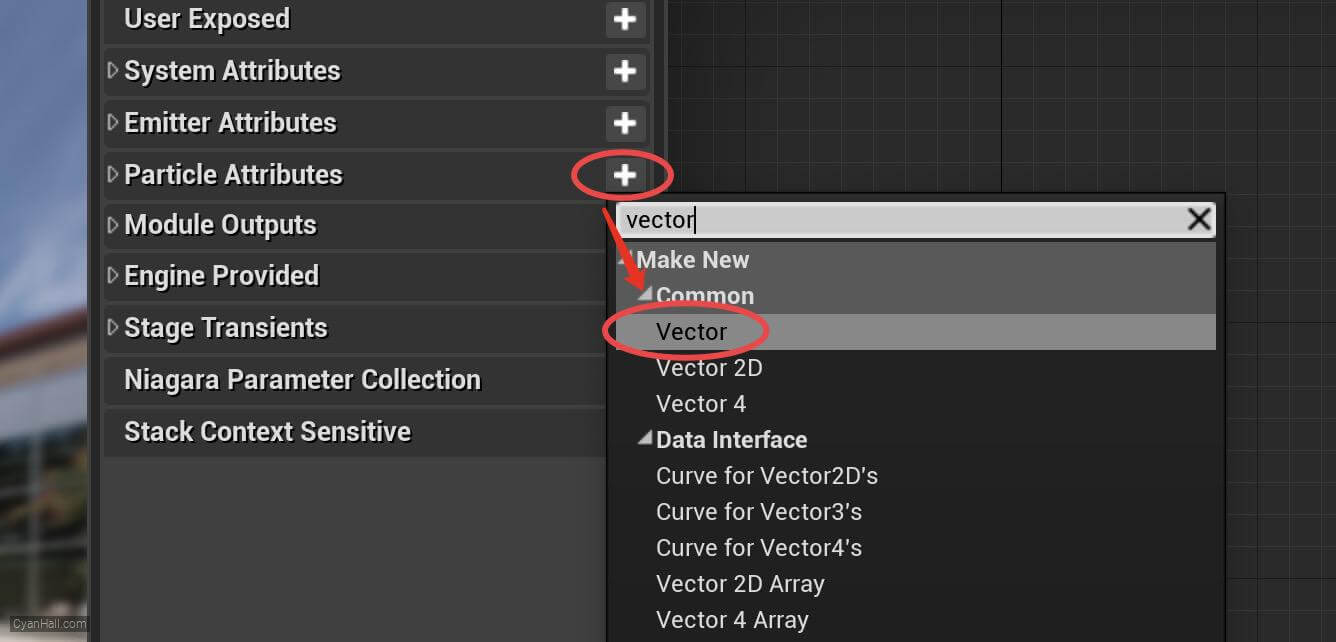
29.
SpriteFacing
Name this newly created variable:
SpriteFacing 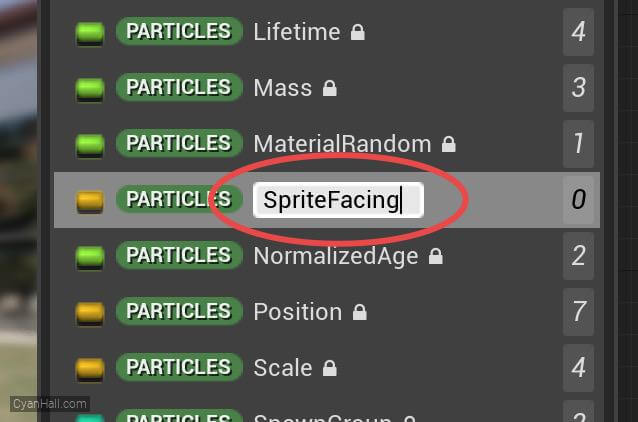
30.
SpriteFacing
Drag and drop
SpriteFacing to Particles Update. 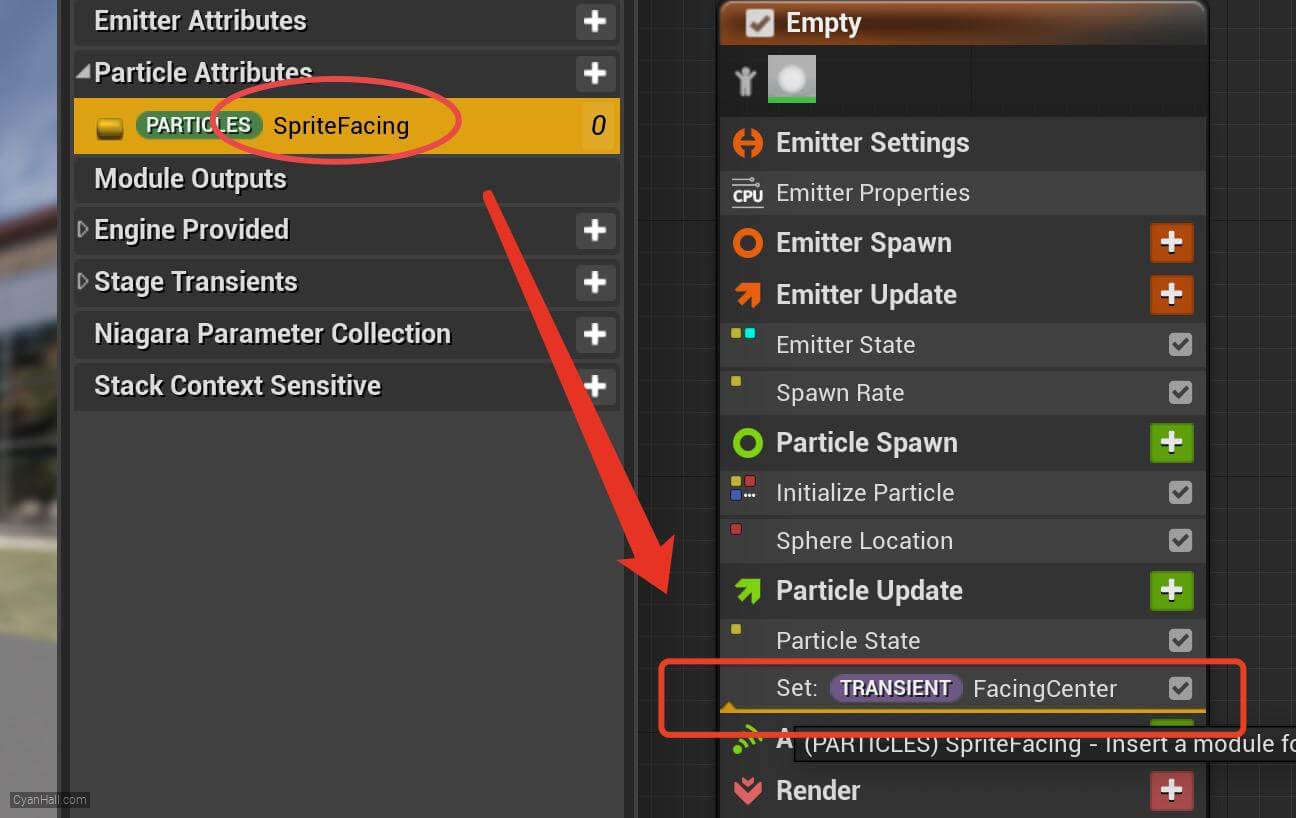
31.
SpriteFacing
Set the value type of
SpriteFacing to Rotate Vector 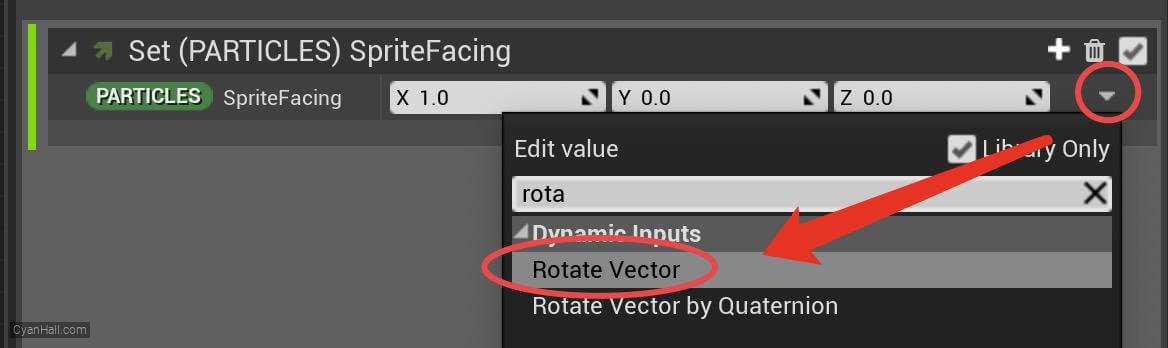
32.
SpriteFacing
Set
Vector To Rotate to FacingCenter. 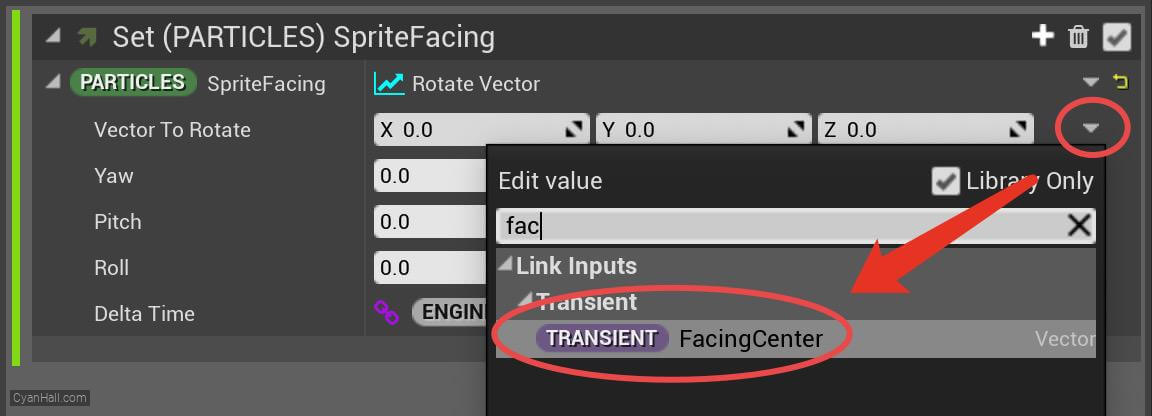
33.
SpriteFacing
1. set
2. set the
Yaw, Pitch, Roll to 60.02. set the
Delta Time value to the Age of the emitter 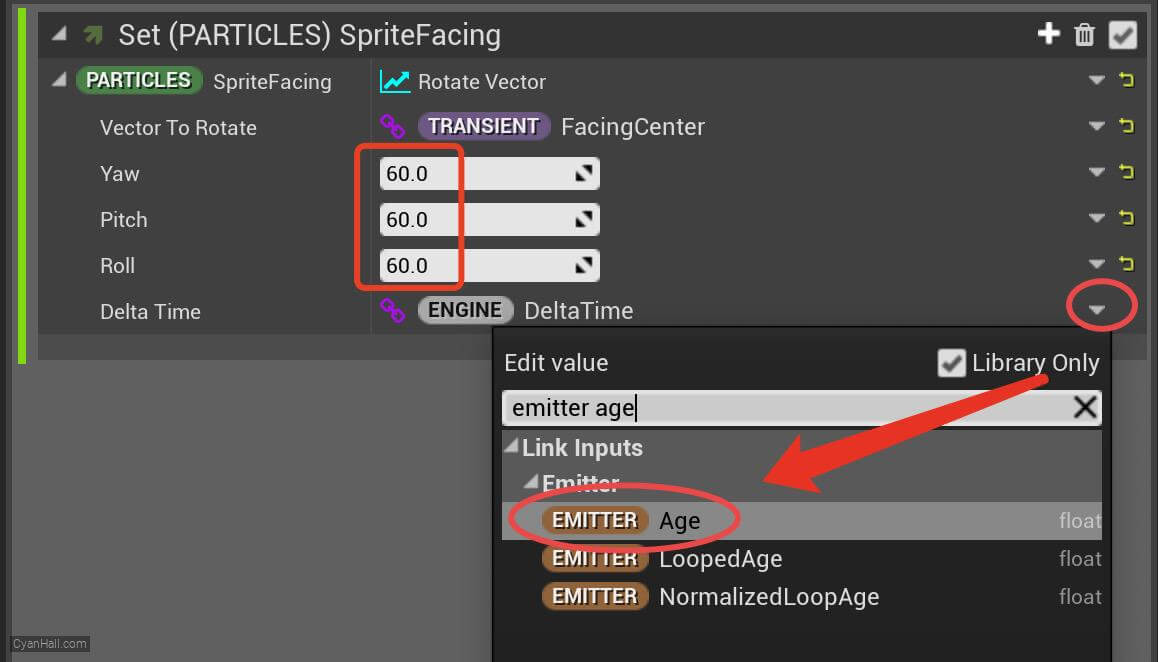
34.
SpriteFacing
Drag
SpriteFacing again to Particles Update. 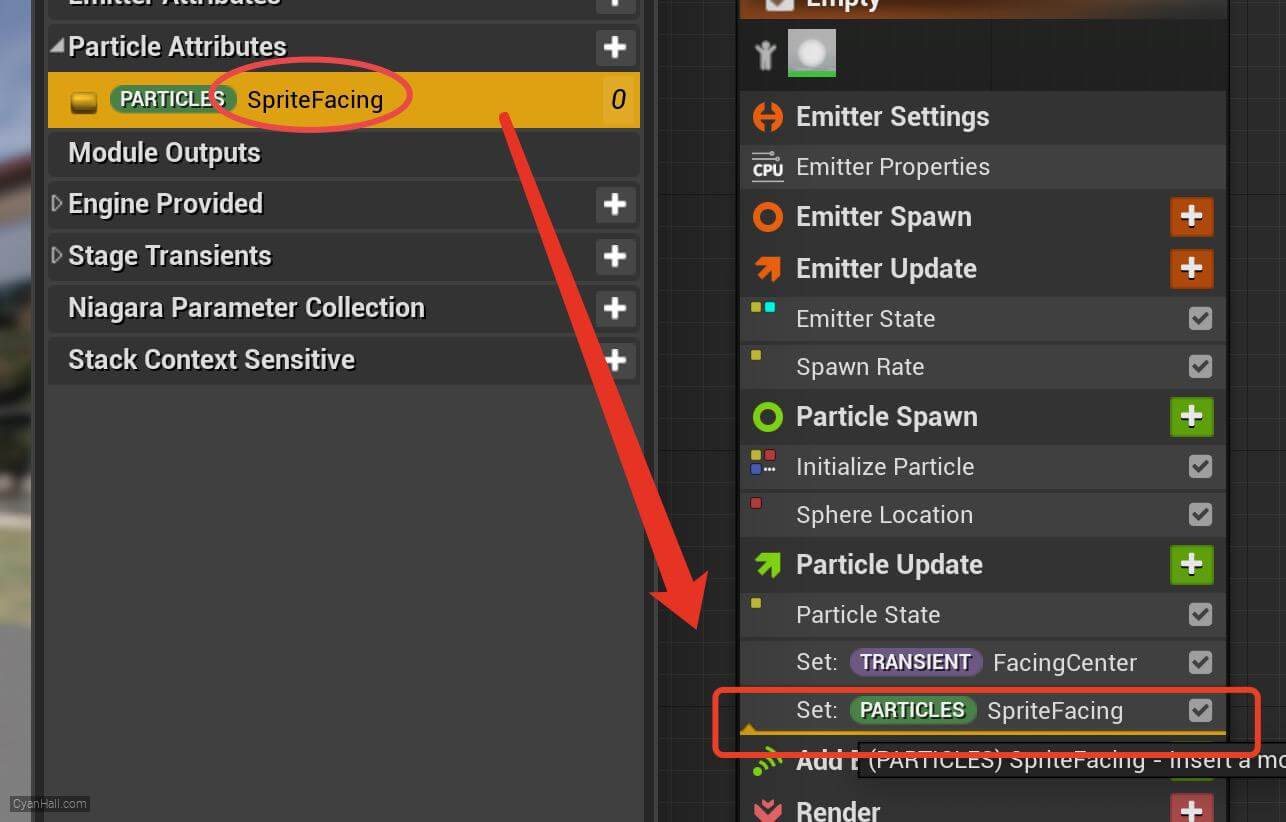
35.
SpriteFacing
Set the value type of
SpriteFacing to Lerp Vector 
36.
SpriteFacing
Set the value of
A to FaceCenter. 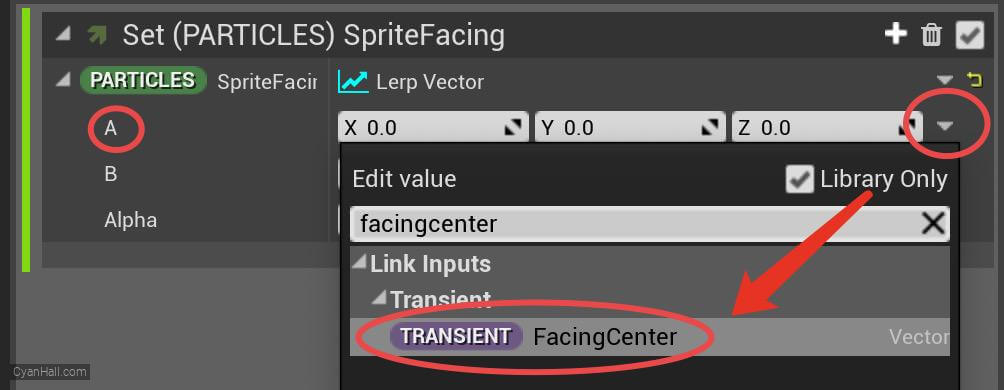
37.
SpriteFacing
Set the value of
B to the SpriteFacing obtained in the previous stage. 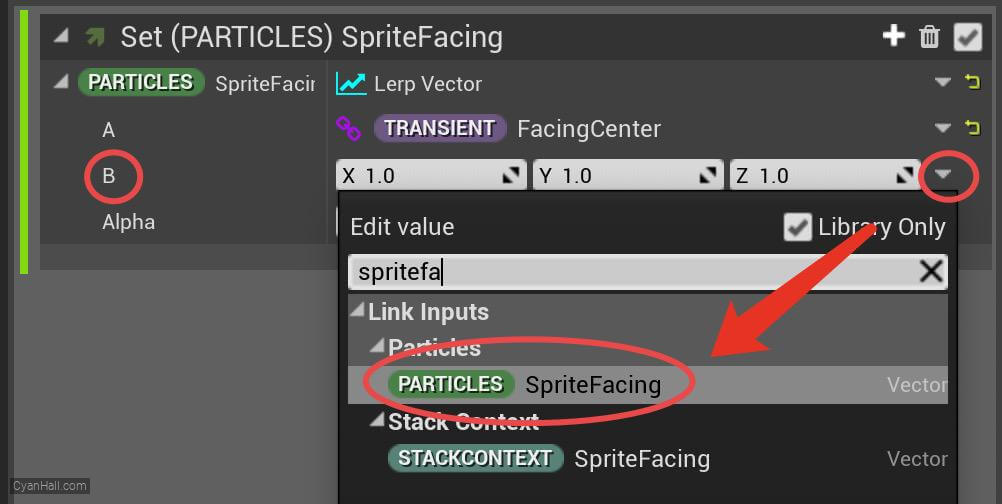
38.
SpriteFacing
Set the value of
Alpha to SineWave.Particles.SpriteFacing is the vector variable which controls which direction a particle faces. In this script we blend between facing an ever spinning vector, and the vector between the particle and the center of the sphere. 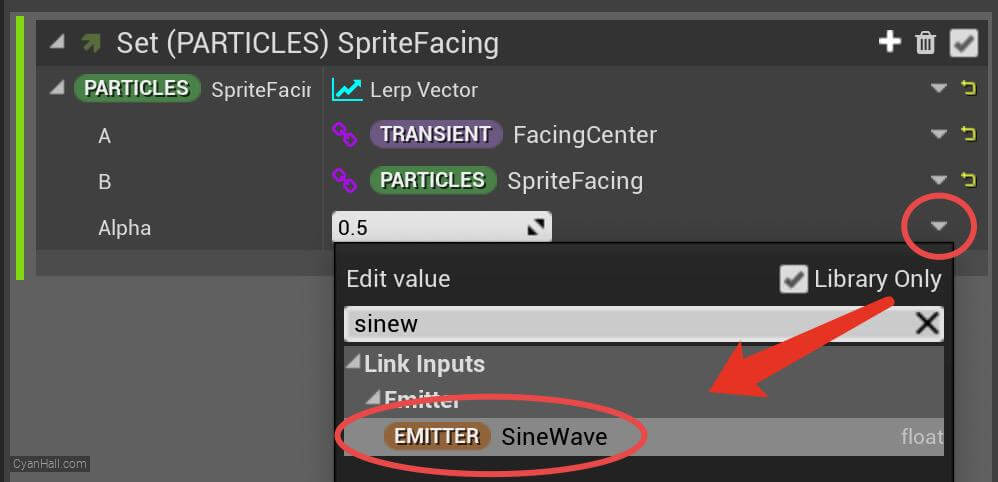
39.
Vortex Velocity
Add
Vortex Velocity module to the Particle Update section. 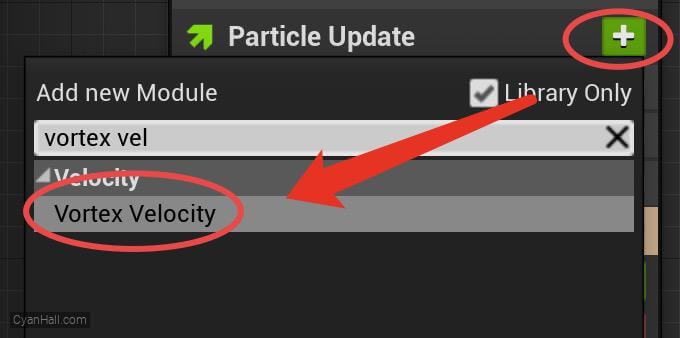
40.
Vortex Velocity
Click the first
Fix issue button to add its dependency on the SolveForcesAndVelocity module. 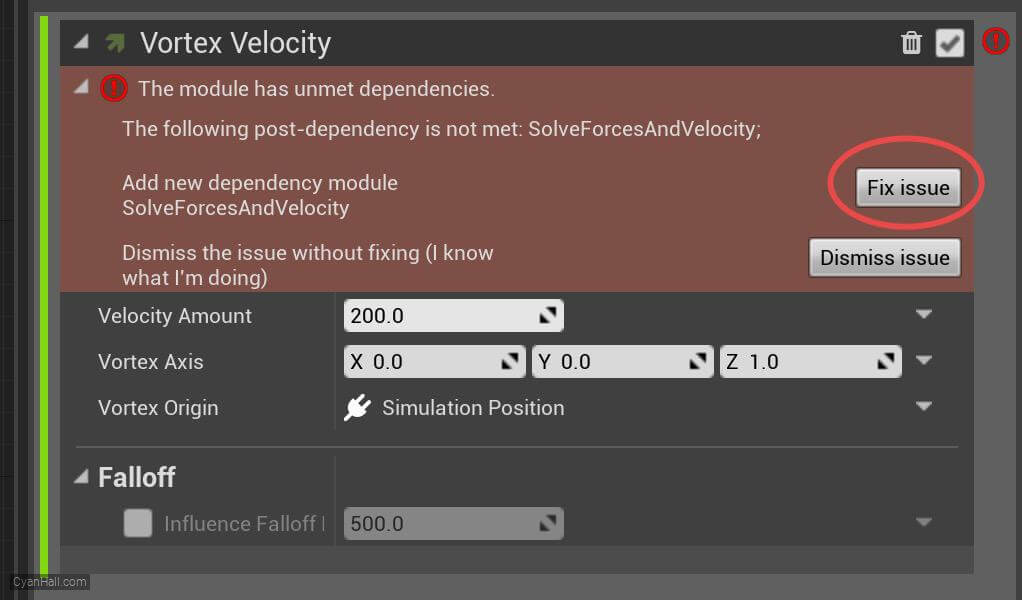
41.
Vortex Velocity
Set the value type of
Velocity Amount to Random Range Float 
42.
Vortex Velocity
1. Set the
2. Set the value type of
Minimum value of Velocity Amount to 50.0 and the Maximum value to 160.0.2. Set the value type of
Vortex Axis to Lerp Vector. 
43.
Vortex Velocity
Set the value of
A Vector of Vortex Axis to Random Vector. 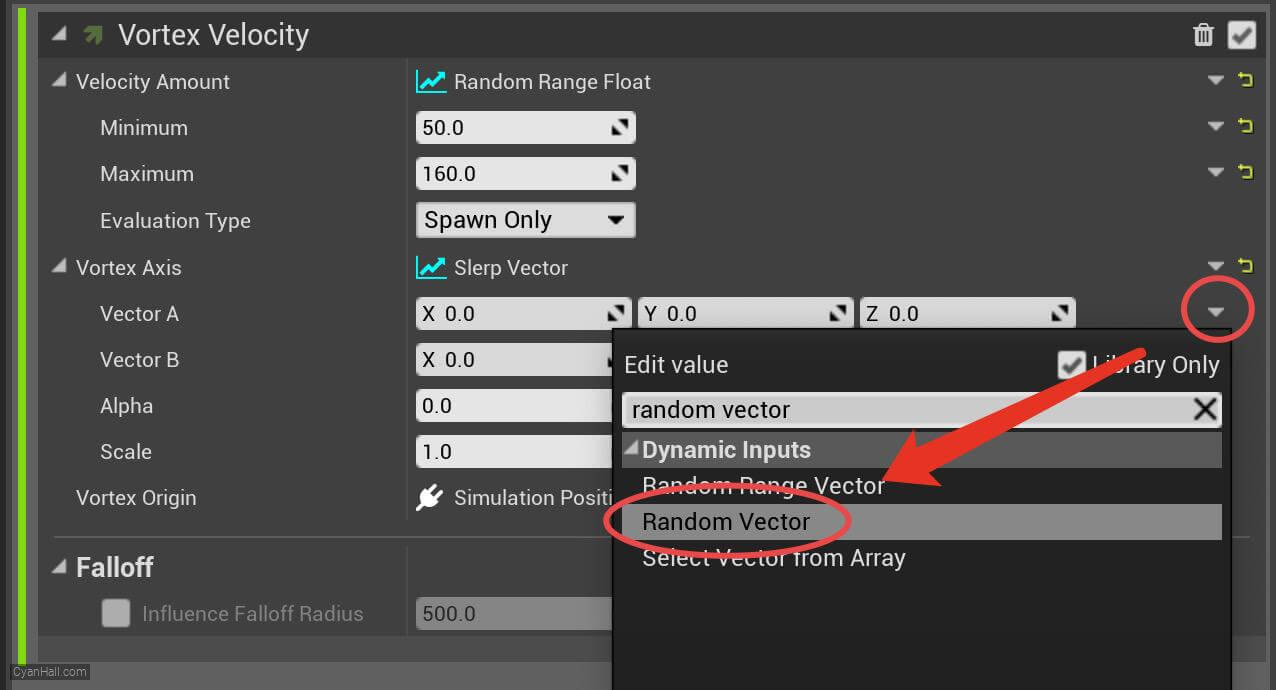
44.
Vortex Velocity
Set the value of
B Vector of Vortex Axis to Random Vector. 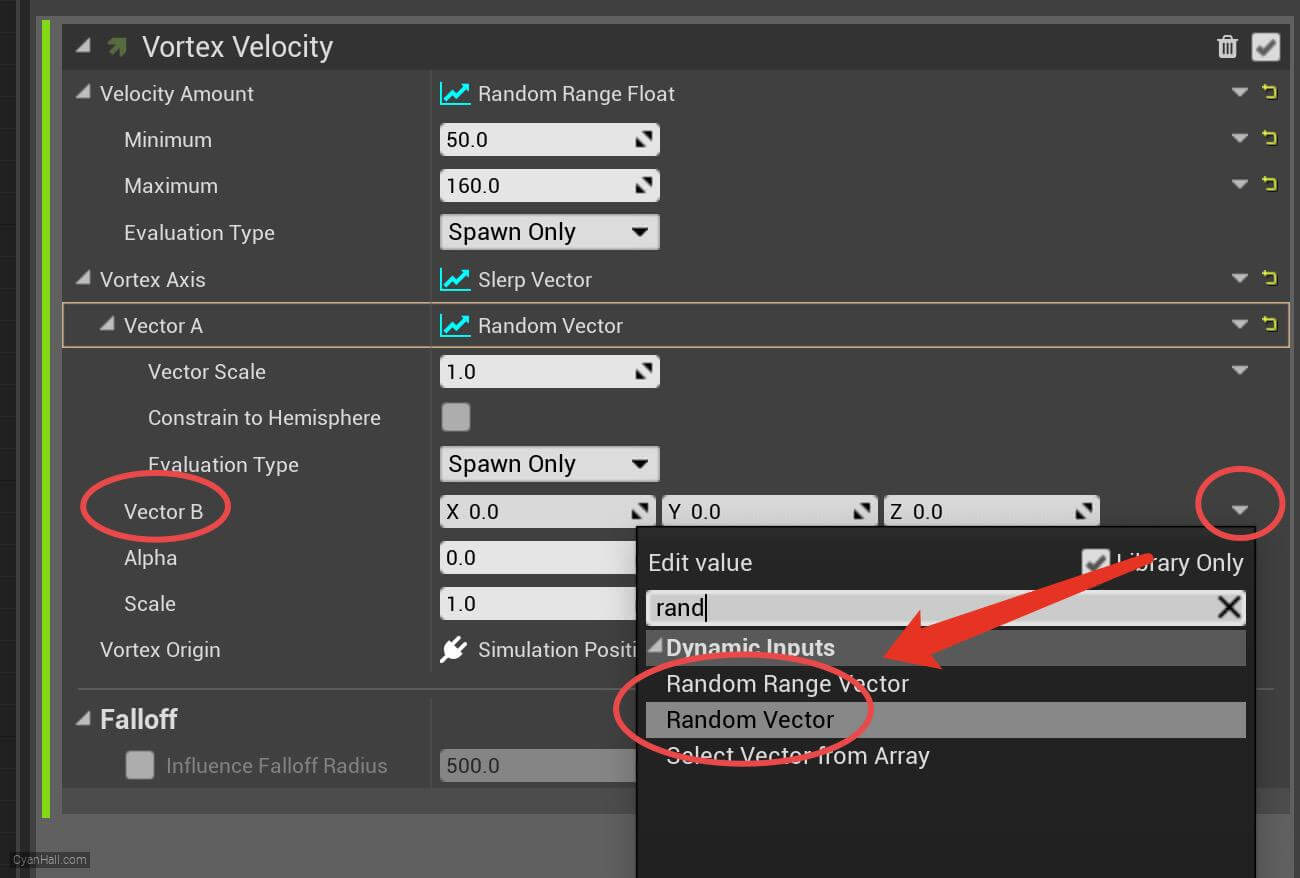
45.
Vortex Velocity
Set the value of
Alpha of the Vortex Axis to the Normalized Age of the particle. 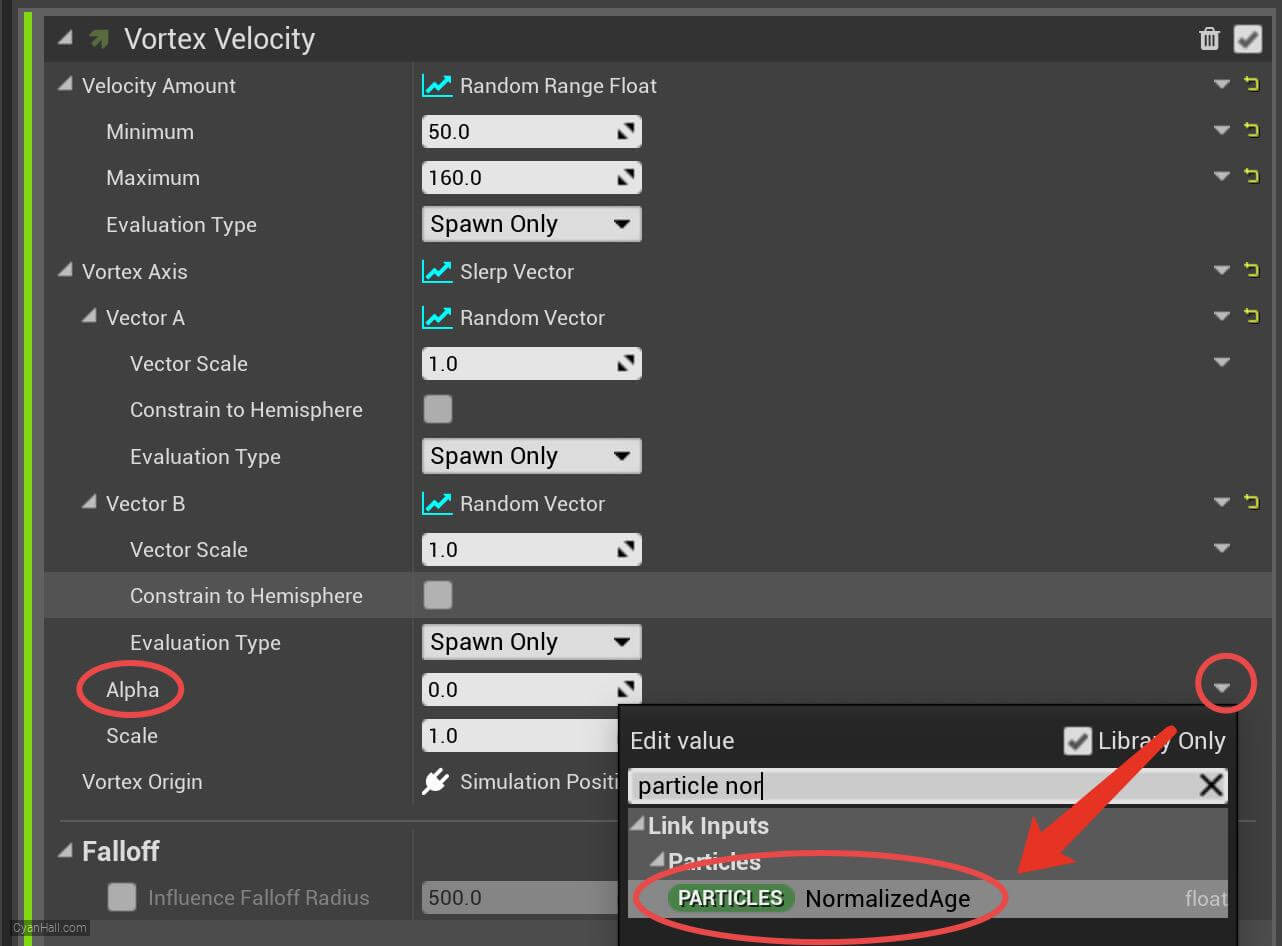
46.
Scale Sprite Size
Add the
Scale Sprite Size module to the Particles Update section. 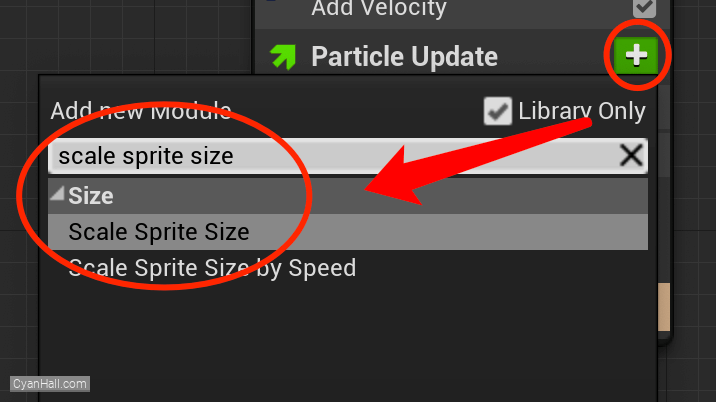
47.
Scale Sprite Size
Edit the
Scale Factor's value to Vector 2DFrom Float. 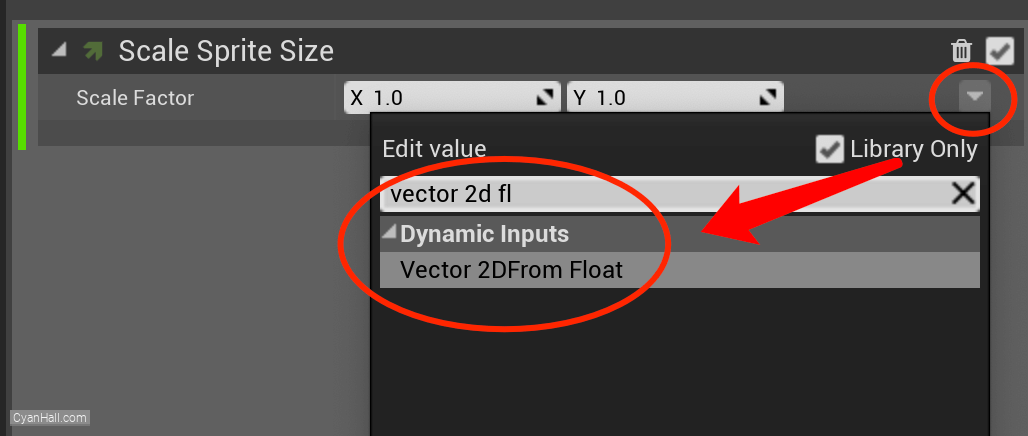
48.
Scale Sprite Size
Set its value type to
Float from Curve. 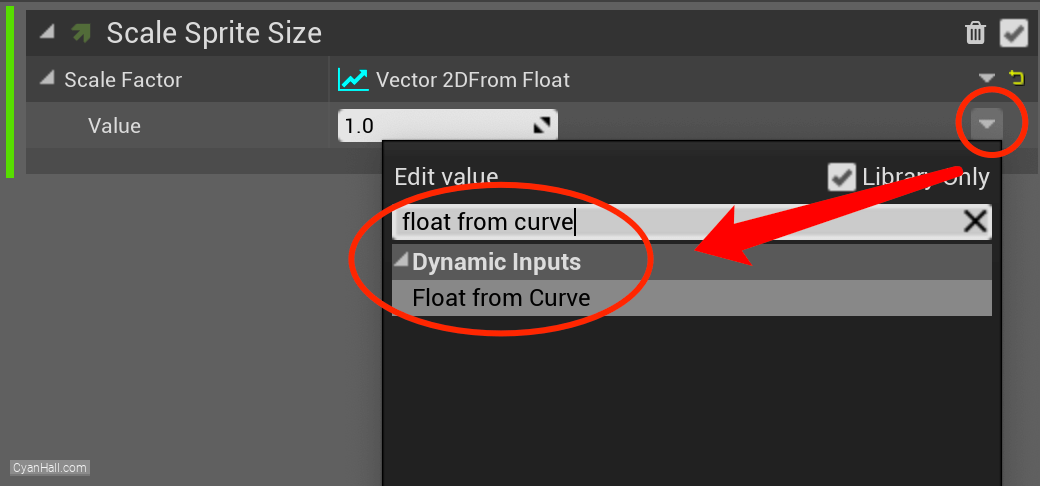
49.
Scale Sprite Size
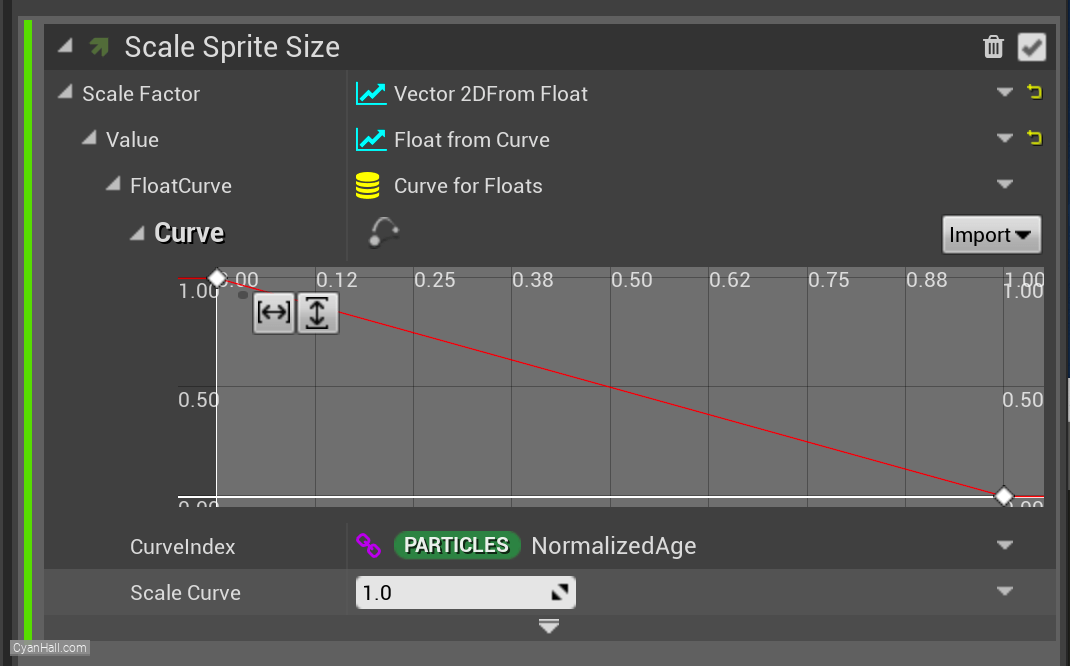
Edit this curve to control its value over time
50.
Scale Sprite Size
Select the first point and drag it to the bottom.
Note: Here you can also select this point and directly set its
Note: Here you can also select this point and directly set its
Time to: 0 and Value to 0. 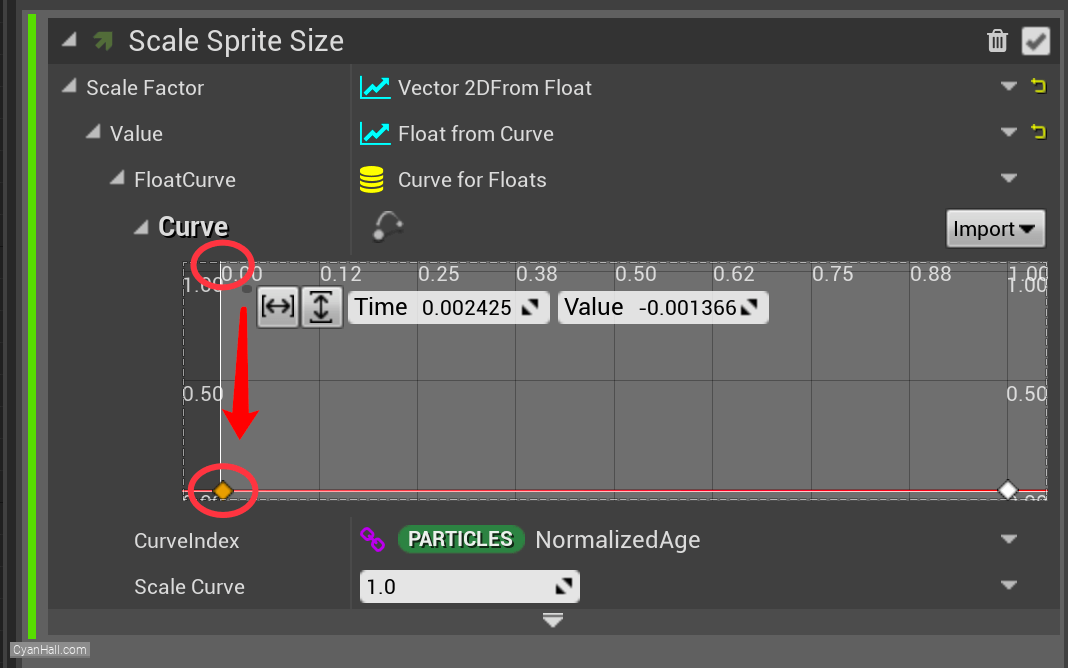
51.
Scale Sprite Size
Mouse over the small red circle, right click, and select
Add key to Curve. 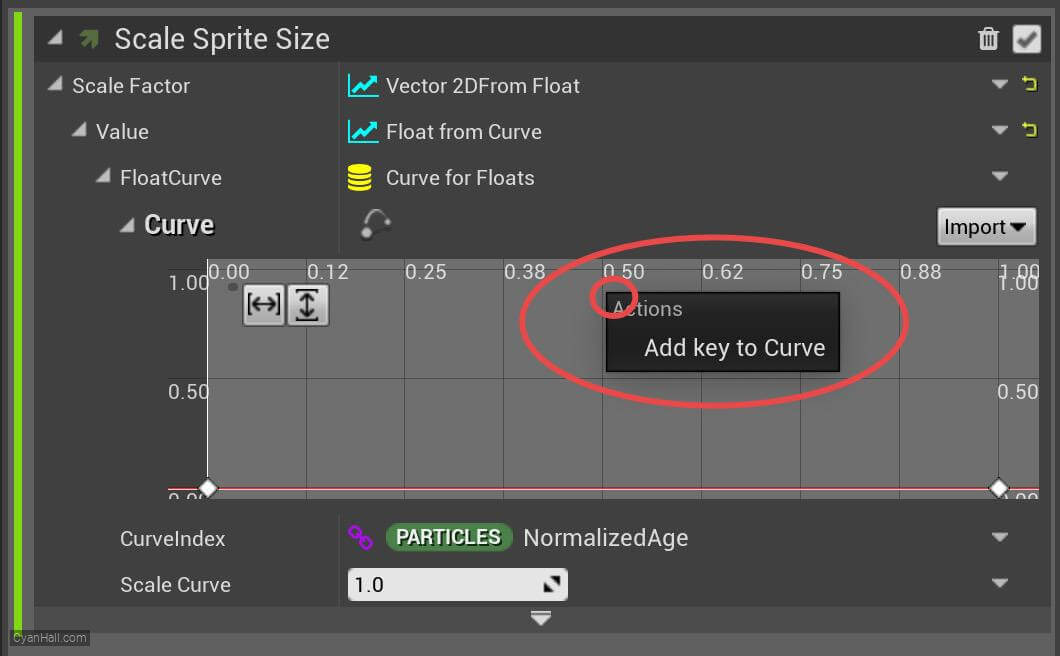
52.
Scale Sprite Size
Set the
Time of the newly added point to 0.5 and the Value to 2. 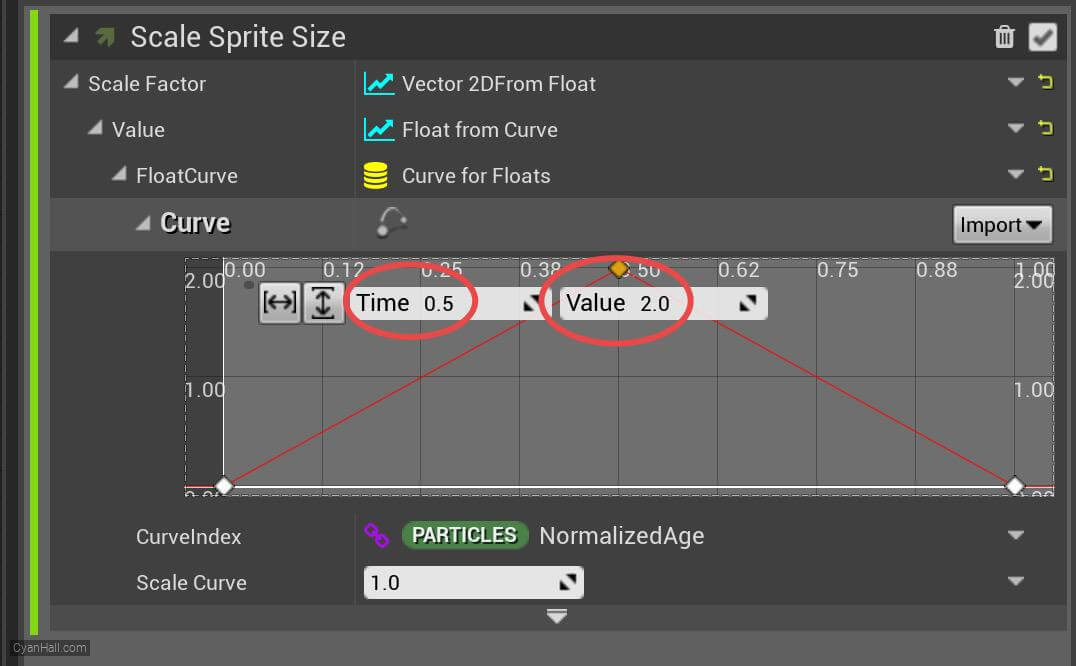
53.
Scale Sprite Size
Sometimes, the newly set points will go beyond the boundaries of the existing chart. You can adjust the chart boundaries by clicking on the button circled in red.
54.
Scale Sprite Size
In the same way, add two points: (time
0.07, value 1), (time 0.94, value 1). 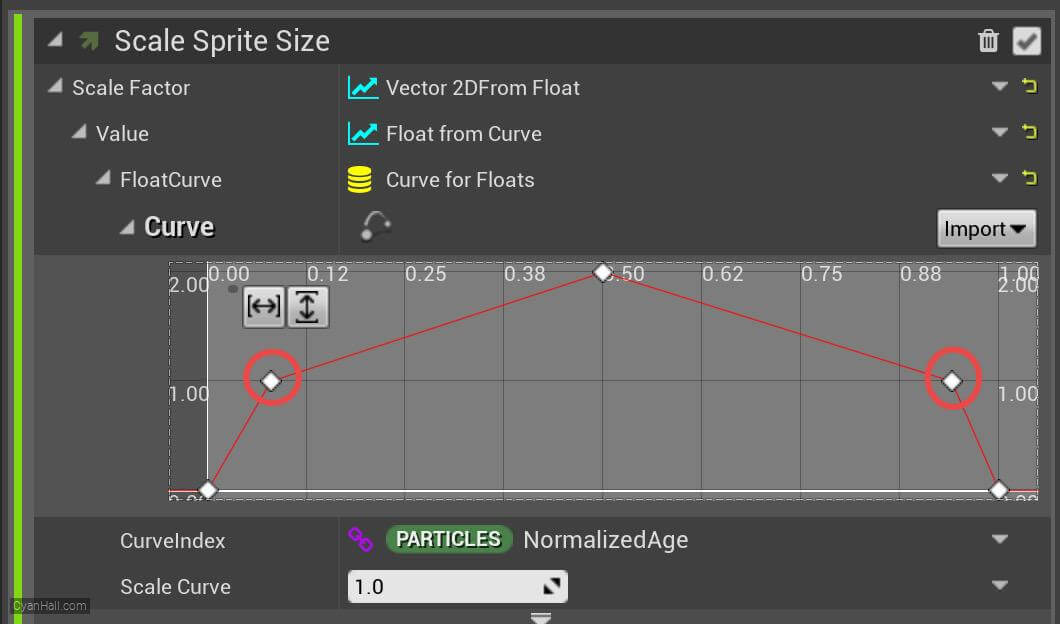
55.
Facing Mode
Select
With this setting, The sprite billboard faces toward the
Sprite Renderer, then set Facing Mode to Custom Facing VectorWith this setting, The sprite billboard faces toward the
Particles.SpriteFacing vector attribute. If the Particles.SpriteFacing attribute is missing, this falls back to FaceCamera mode.FaceCamera mode: The sprite billboard origin is always "looking at" the camera origin, trying to keep its up axis aligned to the camera's up axis. 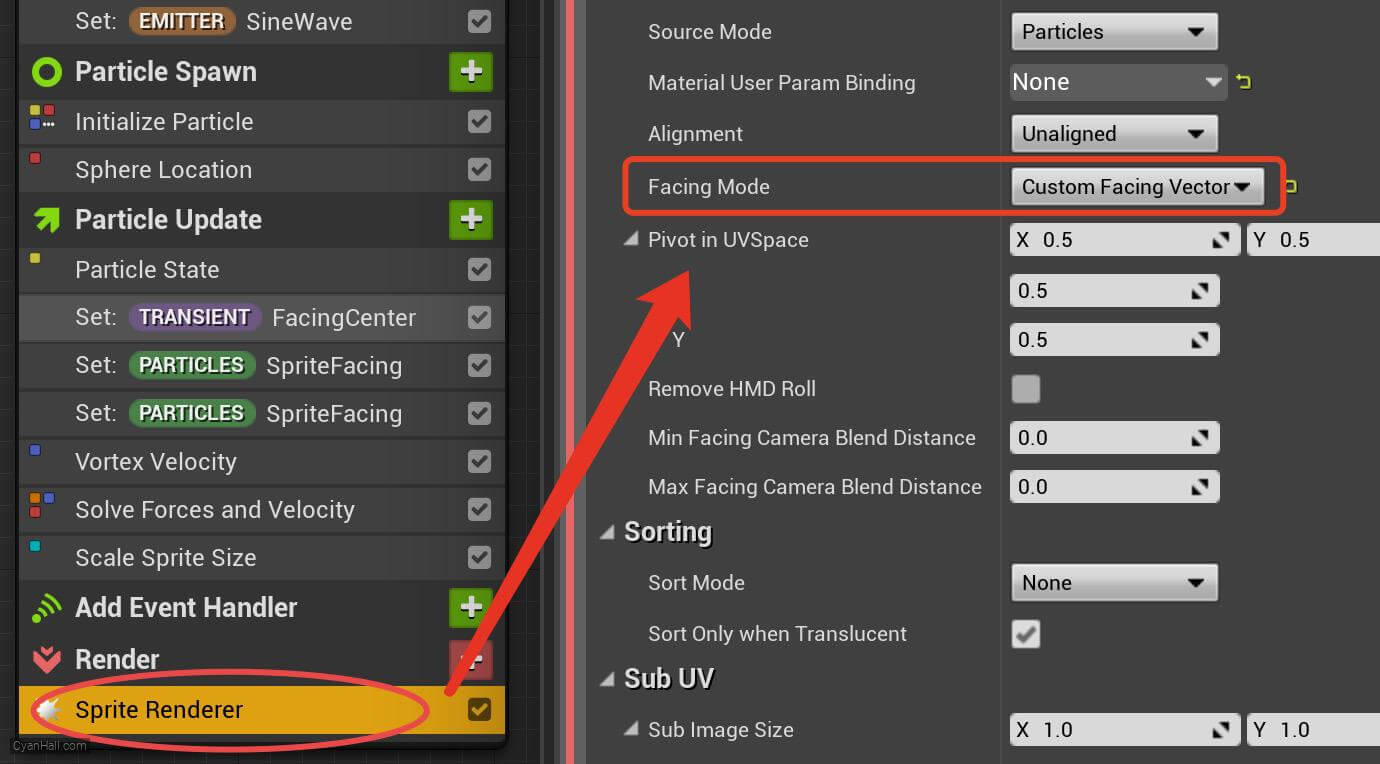
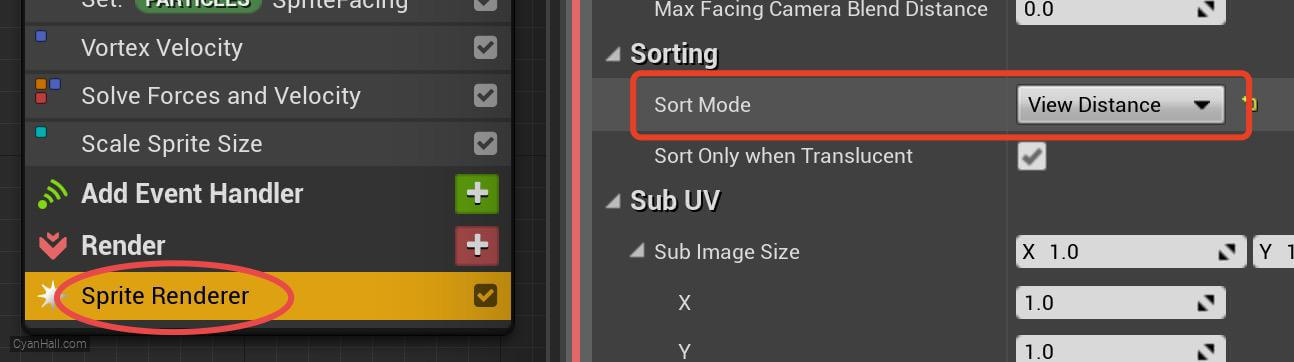
56.
Sorting Mode
Select
This will set the priority to rendering: Sort by distance to the camera's origin
Sprite Renderer, then set Sorting Mode to View DistanceThis will set the priority to rendering: Sort by distance to the camera's origin
57.
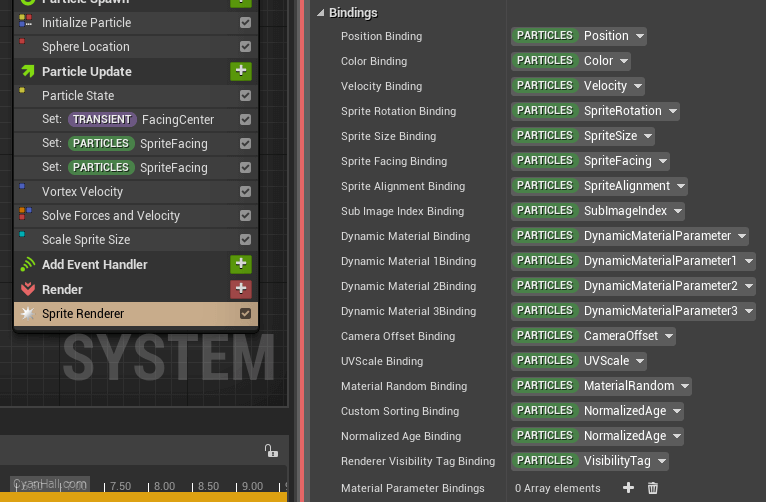
Bindings
You will see a list of particle attributes which have special meaning to the renderers which reference them. Each can be overwritten with other attributes if desired.
Particles.SpriteFacing is not the only Renderer Binding which is handled automatically by the simulation and has special meaning. Click a renderer, in this case the Sprite Renderer at the bottom of the stack, and scroll down to BindingsYou will see a list of particle attributes which have special meaning to the renderers which reference them. Each can be overwritten with other attributes if desired.
58.
🎉 Finish! 🎉
👉 Star me if it’s helpful.
Support Me: Patreon
Follow Me: Twitter, Reddit, Zhihu, Bilibili
Support Me: Patreon
Follow Me: Twitter, Reddit, Zhihu, Bilibili